
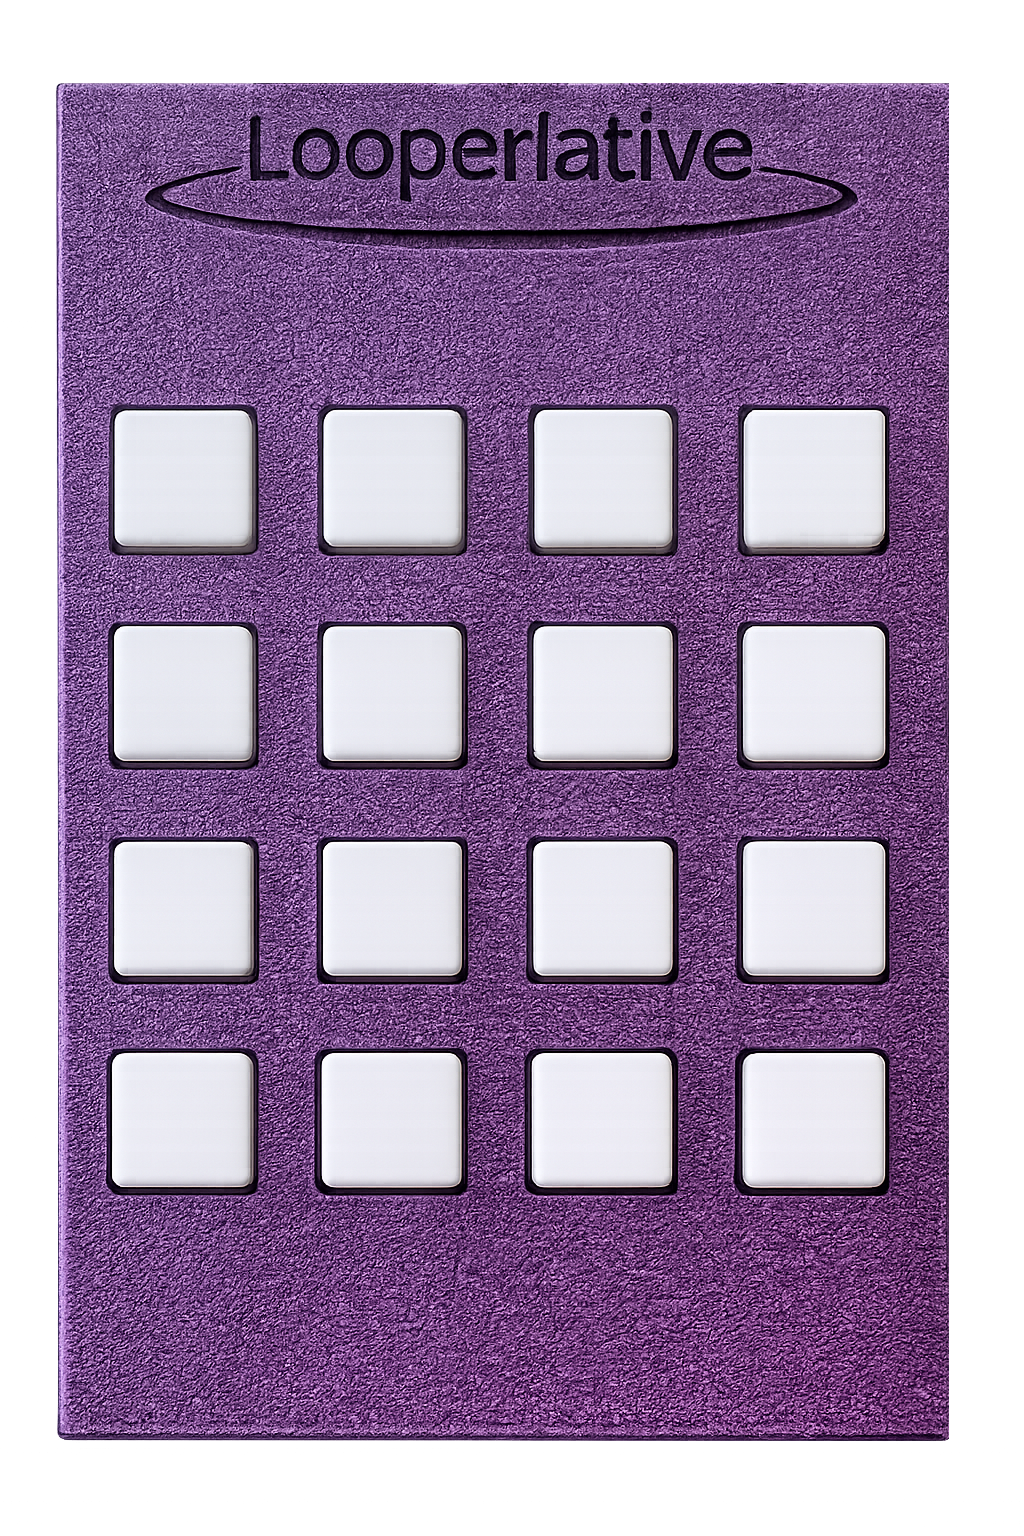
Looperlative Loop Pad ‘Getting Started’ Guide
WHAT NO OTHER LOOPER OFFERS:
Eight Independent Stereo Tracks — More Than Any Current Competitor
Eight truly independent stereo loop lanes, each with its own volume, pan, feedback, and playback state. Sync them all to a clock, run them all free, or combine both in a single performance. No current floor looper matches this track count.
Wireless FLAC Recording to DAW — Capture Your Live Performance Without a Cable
While performing, the Loop Pad can wirelessly send each track as an individual FLAC audio file to your computer. Open your DAW after the show and your multitrack performance is already there, separated by track, ready to mix. No audio interface, no USB cable, no extra steps.
Up to 8 Functions Per Single Button Press
One pad press can trigger a sequence of up to eight separate commands simultaneously. Select a track, erase it, reset feedback, and set it as the clock source — all in one press. Build complex performance choreography into a single moment. The possibilities scale with your imagination.
Generative Playback: Random Restart
Set a track to play once, then pause for a randomly chosen interval before playing again. Each time the interval is different. Loops become unpredictable. Performances become alive. This is a compositional tool that turns recorded audio into something that behaves more like improvisation than playback.
Scramble — Creative Audio Destruction in Real Time
Fast Scramble, Medium Scramble, and Slow Scramble rearrange and fragment your recorded loops in real time. Ostinato functions create rapid repetitive micro-loops from your recorded material. These are performance-grade texture tools that are unique to the Looperlative ecosystem and have no equivalent in any current mainstream looper.
Built-In Harmonic Synthesis Functions
Twelve assignable harmonic interval commands — major and minor 2nds, 3rds, 6ths, 7ths, perfect 4ths and 5ths, octave, diminished 5th, and original note — let the Loop Pad generate harmonic content from your loop material. Solo instrument performers, vocalists, and sound designers gain an on-board harmonist without external gear.
Mixed Sync and Async in a Single Performance
Run some tracks locked to a clock, others completely free, simultaneously. Steady rhythmic loops stay together while ambient, evolving layers drift independently. This is how live looping is actually performed — and the Loop Pad is built for it at its architecture level, not bolted on as an afterthought.
8 Fully Programmable Color Banks — 120 Total Assignable Functions
Eight color-coded preset banks, each with 15 fully assignable buttons (one is always the bank selector), gives you 120 total programmable pad functions. Switch between your verse configuration, your chorus configuration, your ambient soundscape rig, and your reset state by pressing one button. Save all eight banks as a named configuration and load different configurations for different shows.
Physical Orientation Flexibility
The 16-button pad surface can rotate to four orientations with a single button press, accommodating cables coming from any direction and allowing the device to be mounted, tilted, or placed in any position relative to the performer. Build your rig without redesigning your cabling. Tour with the same unit in venues where your setup changes every night.
Stretch to 200%, Shrink to 50%, Multiply, Half Speed
Time-stretch and multiply functions let you double or halve the length of a recorded loop, stretch it to twice its original duration, or compress it to half. Multiply a short phrase into a longer structure. Half-speed a melody for texture. These are compositional tools that most loopers relegate to software — the Loop Pad makes them available in real time, on stage, from a single button.),
Bounce, Copy, and Multi-Track Compositing
Bounce combines multiple tracks into a single loop. Copy duplicates a loop to another track. Set As Result Track defines where bounced content lands. These are DAW-style composition tools in a live looper, enabling you to consolidate a complex eight-track arrangement into a single playable loop for the next section of your performance.
No Registration Required. Automatically Licensed.
Every Loop Pad ships fully licensed. No activation code. No account creation. No registration wall between the user and their instrument. Plug in, connect, play. In an era when hardware increasingly requires account management and cloud dependencies, this is a meaningful statement about what kind of company Looperlative is.
The LoopPad incorporates over 20 years of evolution in looping. The LoopPad is built from the same software base as the current LP1 and LP2, but with a new user interface and a modern hardware set that makes it more powerful and less expensive than the LP1.
Specifications
- Latency below 1ms
- Audio is 48kHz 24-bit samples
- 512MB of running audio memory for a total of over 23 minutes of running audio
- Persistent audio storage on microSD
- Stereo audio in via TRS 1/4" connector
- Stereo audio out via TRS 1/4" connector
- Switch selectable input gain
- Switch selectable output gain
- Power supply is +9VDC 2A (actual power usage varies with use)
- USB MIDI via 4 USB-A ports (supplies power through the USB-A ports if your device is designed to use it)
- 16 silicone-rubber pads arranged as 8 banks of 15 buttons
- Lights under the pads indicate track status, volume & feedback, selected pad bank & WiFi status
- Ethernet DHCP client or DHCP server
- WiFi SoftAP mode
- Fanless design for the quiet studio
- Configuration via Looperlative Configure application available for Windows, MacOS and Linux
BASIC FEATURES:
- Record, overdub, and playback on independent tracks
- Play/Stop with both immediate and sync'd timing options
- Undo and redo
- Track erase
- Volume control per track
- Firmware updates via the companion app or connection method
ADVANCED FEATURES
- MIDI in and out for clock sync and command triggering
- The ability to run loops synchronized to an external clock source
- Stereo input and output
- Wet/dry signal routing options
- The ability to save and recall configurations
- Half speed playback
- Reverse track
- Multiply
- MIDI clock output (not just input)
- The ability to load pre-recorded audio files to a track and trigger them
- A built-in pattern sequencer or drum machine
- Pan control per track
- Expression pedal and external controller support via MIDI or USB
- Stretch and shrink functions
FEATURES SHARED ONLY WITH LOOPERLATIVE'S PRIOR DEVICES (LP1 / LP2)
- Eight independent stereo tracks — shared with LP1, the only prior device to offer this
- Feedback (destructive gradual audio reduction)
- The ability to mix sync'd and asynchronous tracks in a single session
- Wireless FLAC Recording to DAW
WHAT’S IN THE BOX:
- Loop Pad device
- Approved power supply (must be 100-240 VAC 9V 2A center positive)
- An Ethernet cable is NOT included and must be supplied by the user
Support and the firmware download page: https://looperlative.com/support.php
INTRO:
Welcome to the Loop Pad, a Looperlative Audio Products next‑generation looping instrument for solo artists, bands, sound designers and theatres to do live looping, soundscape design and song building in real time.
In this guide, you’ll learn how to power it up, integrate it with the Loop Pad Configure app on your computer, and use the 16 colored LED pads to record, overdub, play and erase your first loops.
The Loop Pad gives you eight independent stereo tracks, plus stereo input and output, so you can build rich, layered performances.
You can use the headings or video chapters to jump around this tutorial
Before we plug it in, let’s take a look at the device.
FIRST LOOK:
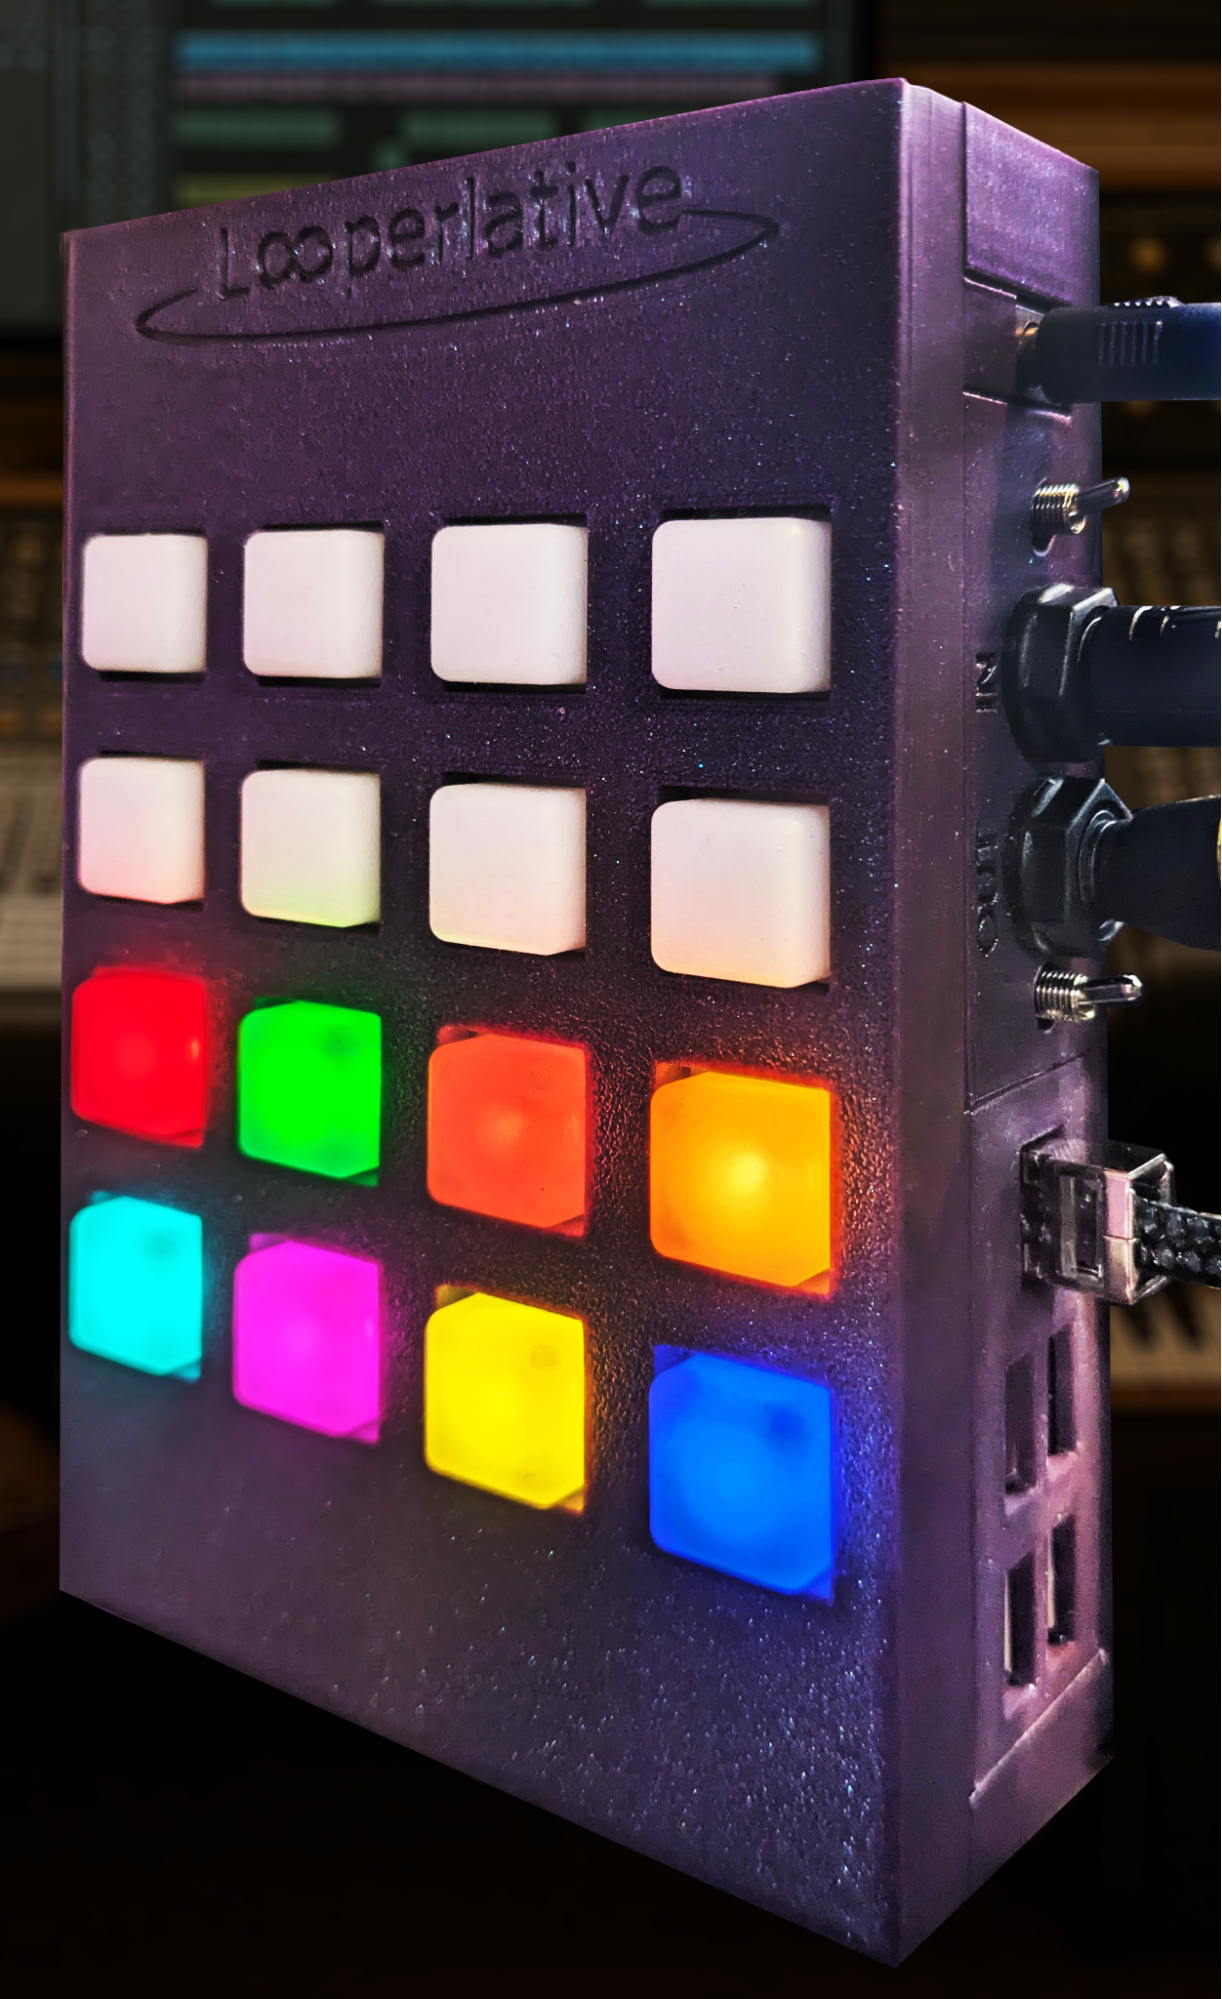
16 Multi-Color LED Buttons
There are sixteen buttons that are your main hand controls for selecting tracks, recording, overdubbing, and triggering a wide selection of functions. Once powered up, you’ll see that these buttons are multi‑colored LED’s.
Side Panel Connections
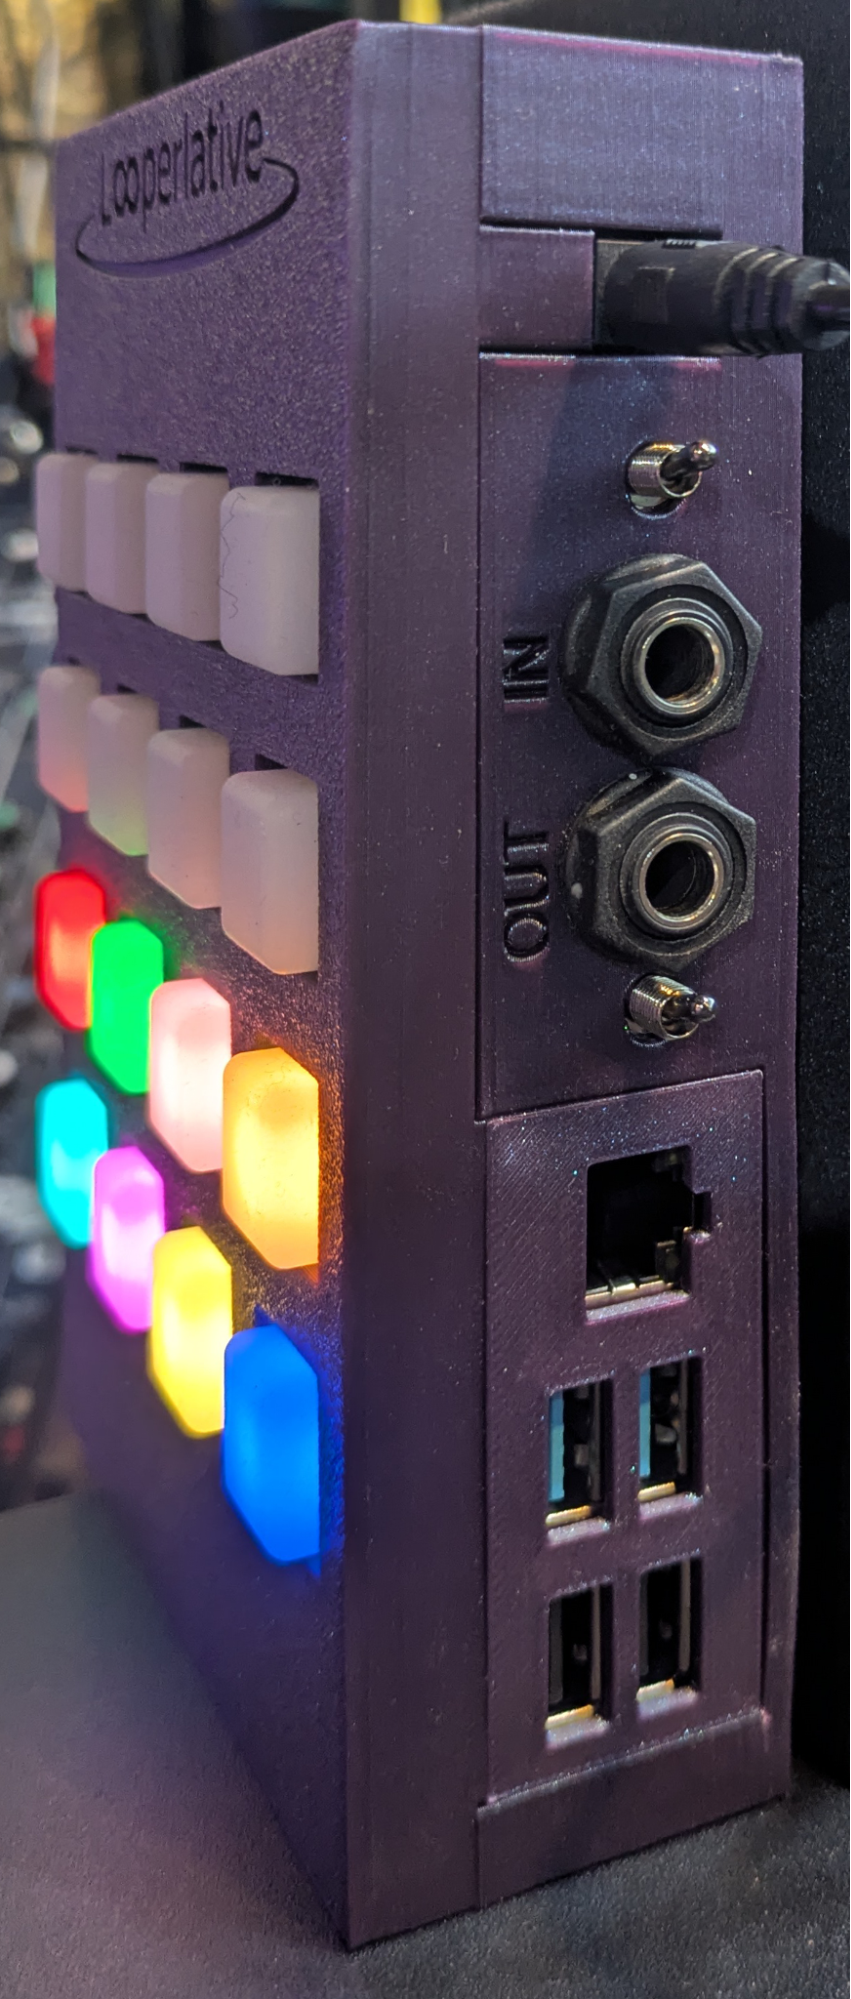
On the side, is the power connector, stereo ¼” inputs and outputs both with toggle switch attenuation. There is an Ethernet port for network and app integration, and four USB ports for connecting controllers, clock sources and other devices. The USB ports are host-mode ports and cannot be used for connecting to a computer.
Midi Controllers, Wireless or Ethernet Connectivity, Wireless Live Capture
In addition to the 16 onboard pad controls, the Loop Pad also works with a wide range of foot and hand controllers. The Loop Pad can communicate wirelessly or via Ethernet with the Looperlative Configure computer application, and it can send your tracks as independent FLAC files wirelessly to your computer while you are recording.
LOOPERLATIVE APP:
Download and Install ‘Configure’ App
A key element of the Looperlative ecosystem is the Looperlative Configure app, which permits the user to observe behavior in realtime and to program the buttons using the app to trigger any of the available functions or commands.
Navigate to https://looperlative.com/support.php and download and install the control application, Configure, for Mac or PC, depending on your system.
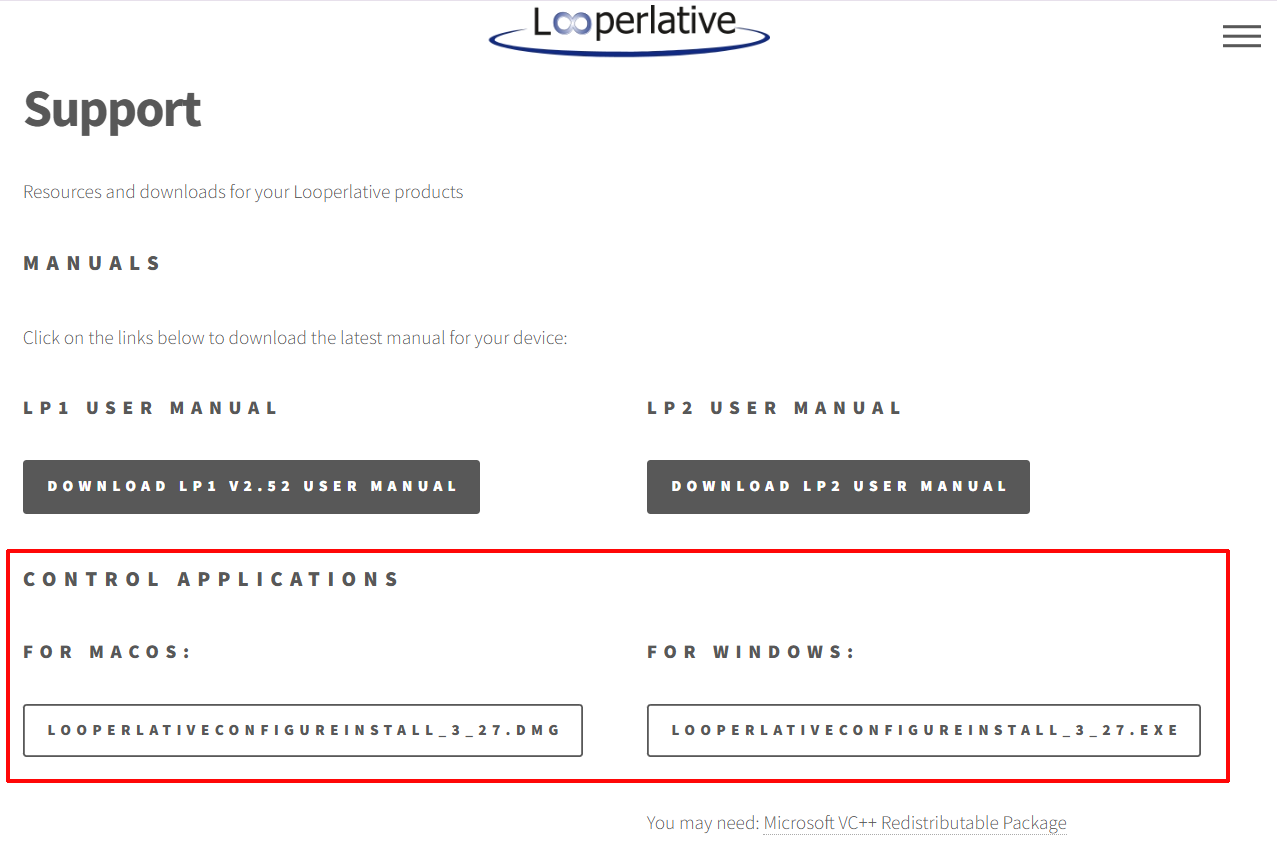
After the app has downloaded, locate the downloaded file and click on ‘Install’.
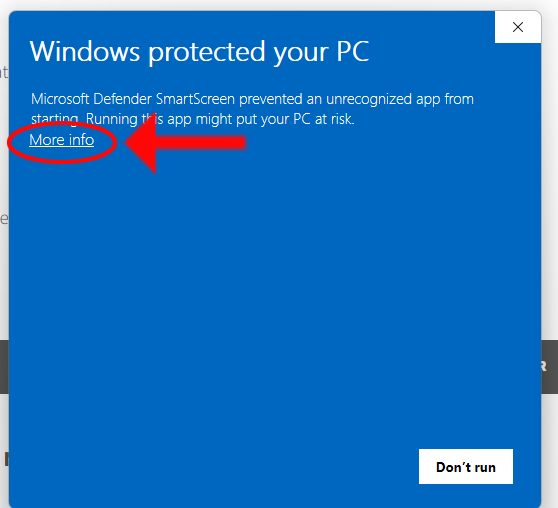
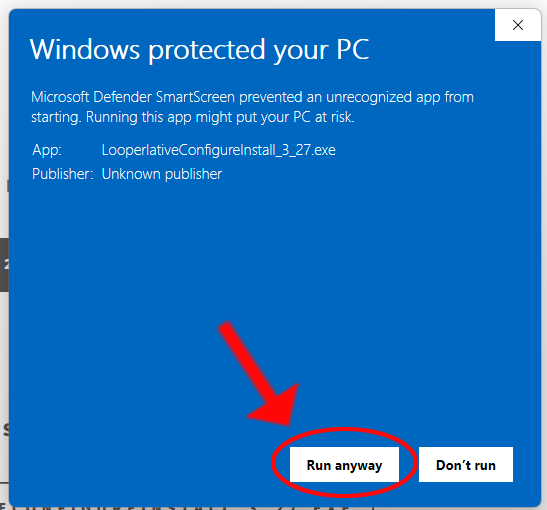
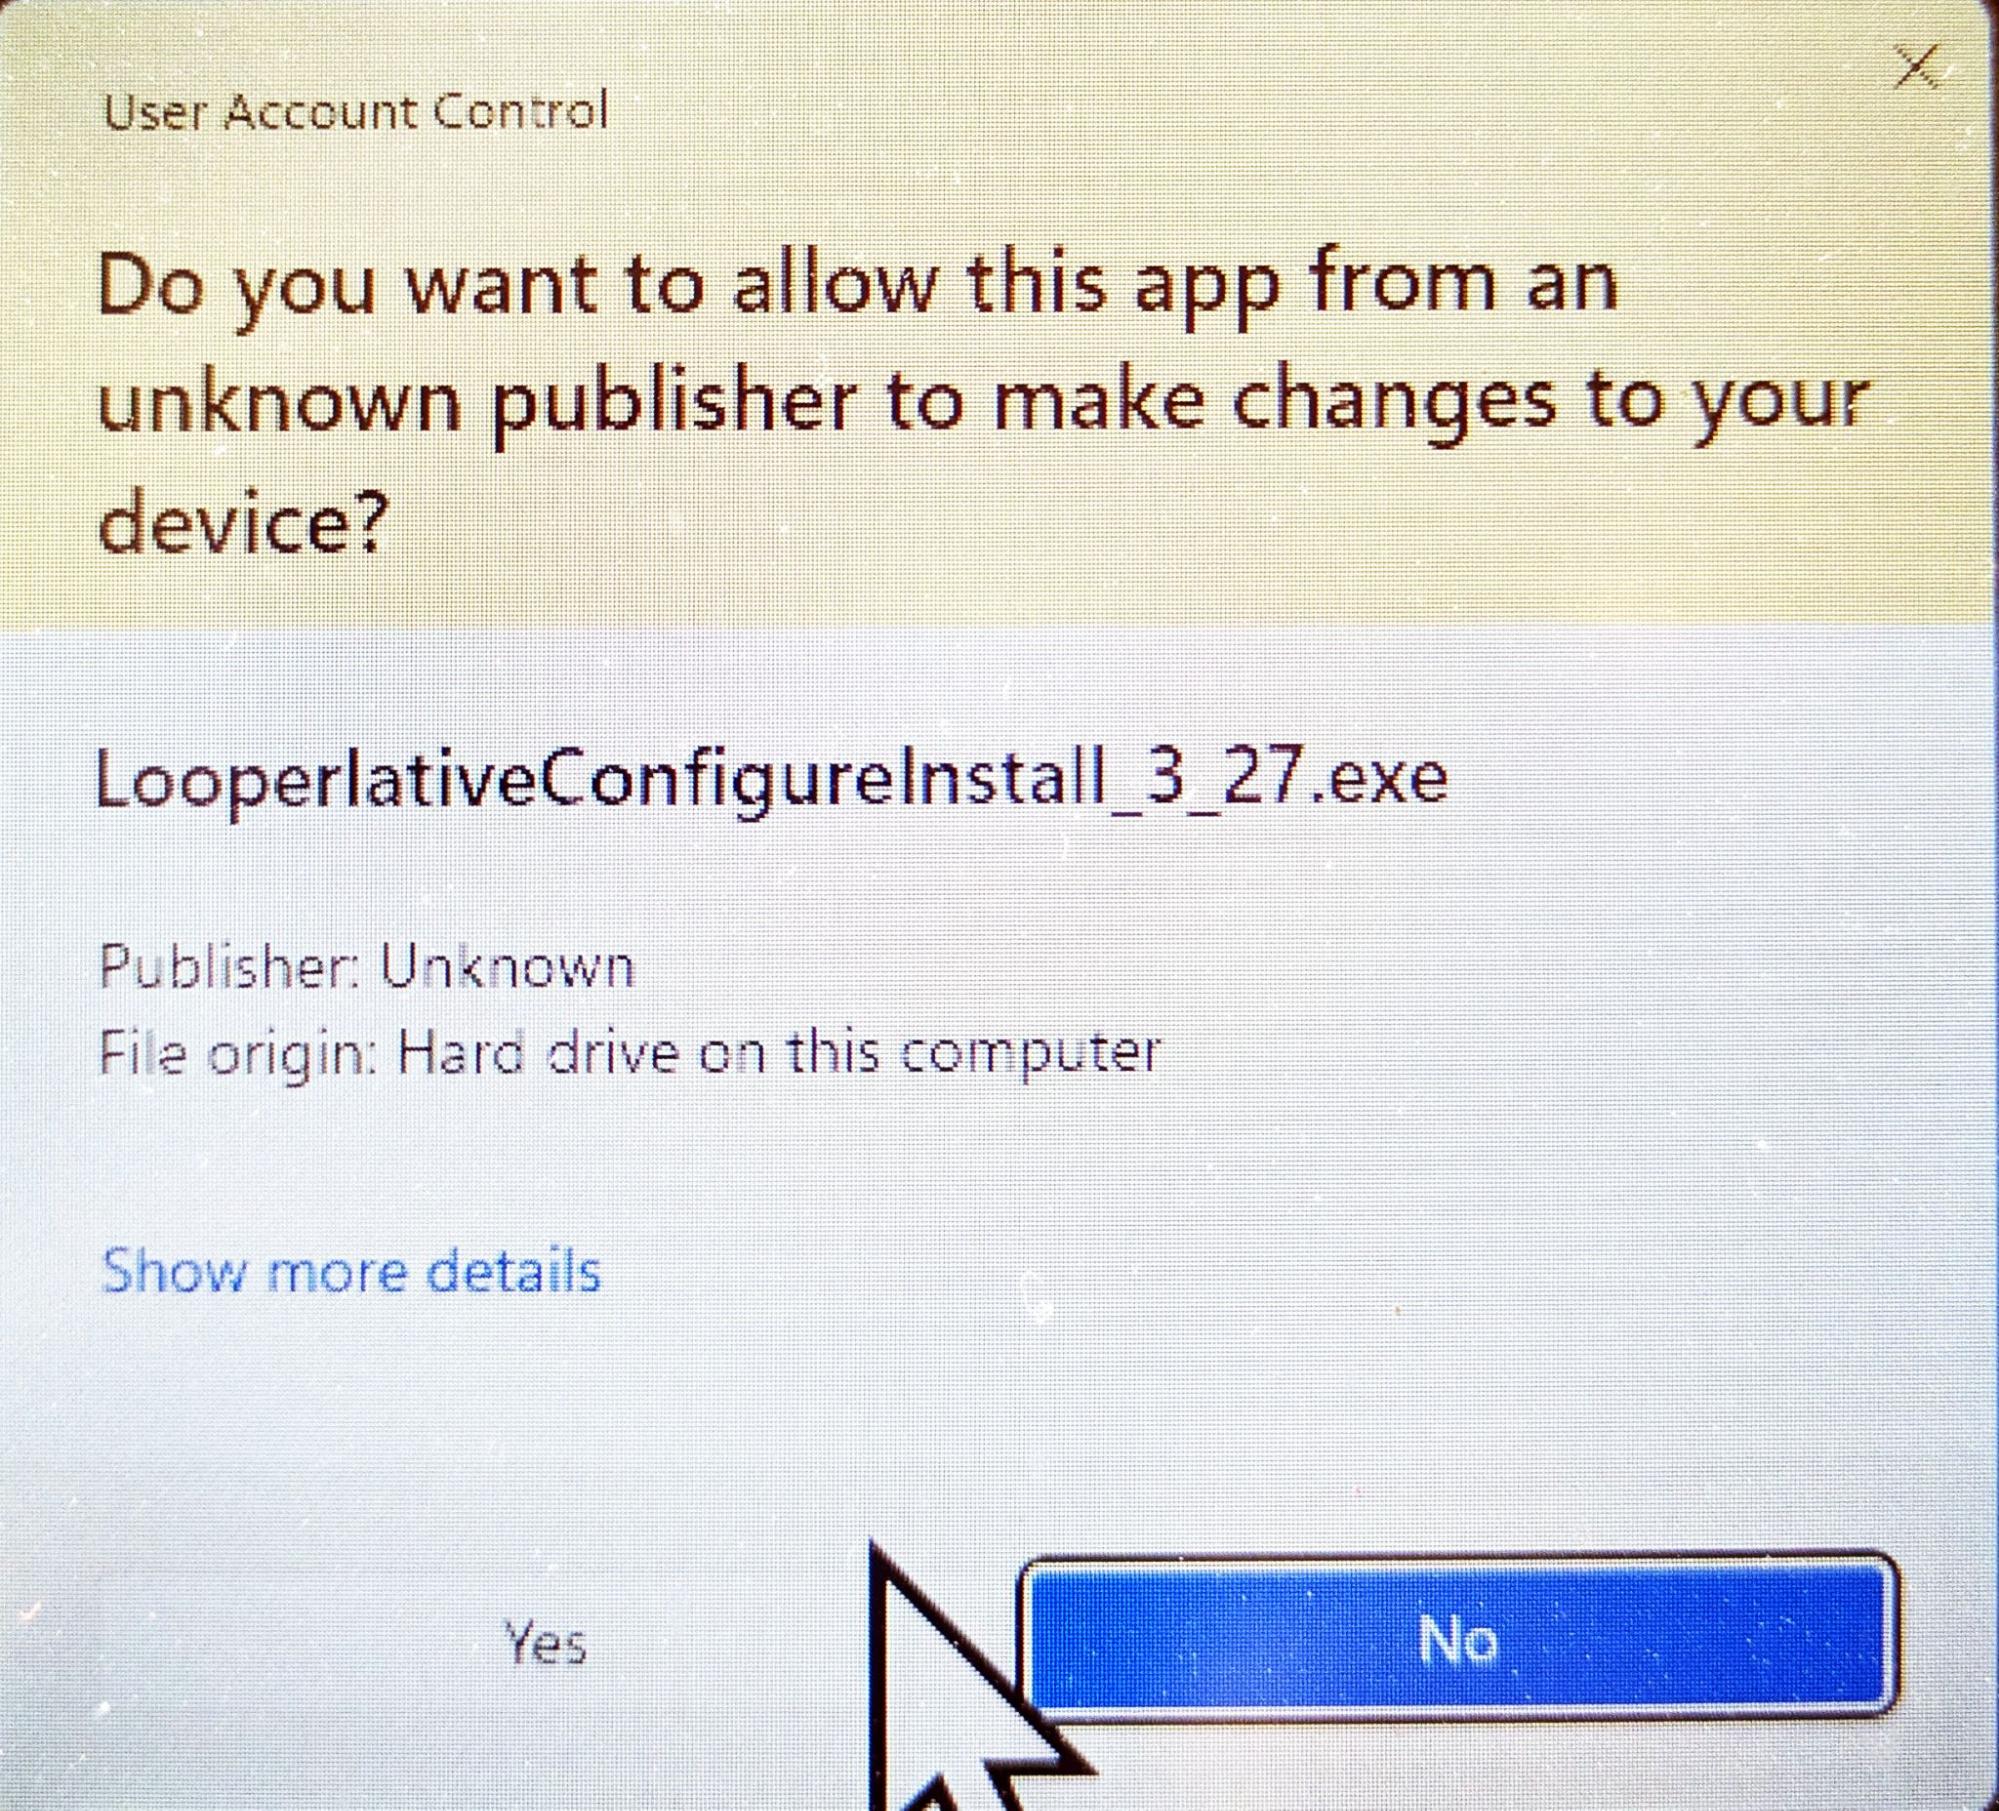
On Windows, you may get a Microsoft Defender Smart Screen pop-up that says it’s preventing an unrecognized app from starting. Go ahead and choose ‘more info’ and then click the button ‘Run Anyway’ in the lower right corner of the dialog box pop up, approve any additional warnings and allow the app to place a shortcut on your desktop for easy access.
After downloading and installing the App, also download the latest firmware for your device. Save that in a place that you can easily find it later, once we’ve gotten your Loop Pad and the App communicating with each other.
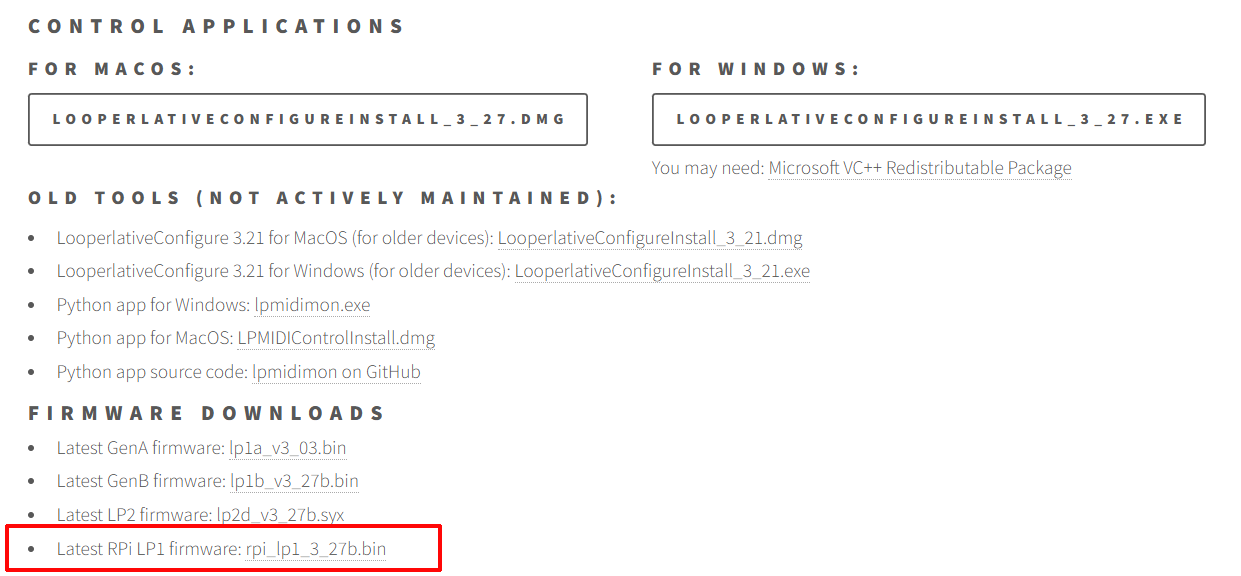
When the Configure app is installed, you can upgrade to the newest firmware using the 'UPGRADE' button on the Main Tab of the Configure app.

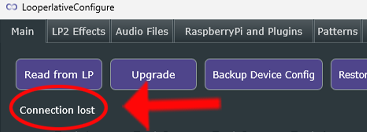
But first you have to launch the app. When it loads, notice where it says ‘Connection Lost’ in the left area near the top of the first screen, this is where you’ll be able to tell when the app and the Loop Pad are connected when we get to that part of the tutorial.
EIGHT STEREO LOOPER TRACKS:
Each of the eight tracks on the Loop Pad is a stereo loop lane. A loop is one repeating cycle of audio on that lane. You can add layers as Overdubs on each track and engage a wide range of effects and changes before and after recording loops.
The Loop Pad can follow a click from a drum machine, or follow its own internal master clock. It can also send clock data to other devices. The Loop Pad supports the same core interface and control functions as LP1 and LP2, plus has some new features we’ll explore in upcoming tutorials.
Tracks can run in sync with the internal clock, or an external clock source using a MIDI interface, but you can also run tracks asynchronously for more free, evolving soundscapes, and you can combine sync’d and asynchronous loops
If sync’d, the loops can be multiples or increments of each other, when unsync’d (asynchronous), the loop lengths are independent of each other.
The sixteen LED buttons can be rotated or oriented in any of four directions, meaning you can set the Loop Pad in the most convenient position relative to your rig orientation and the Loop Pad cables. When the Loop Pad is displaying the eight color LED buttons, pressing either of the two unlit corner buttons will enable rotation of the display to any of four possible orientations.
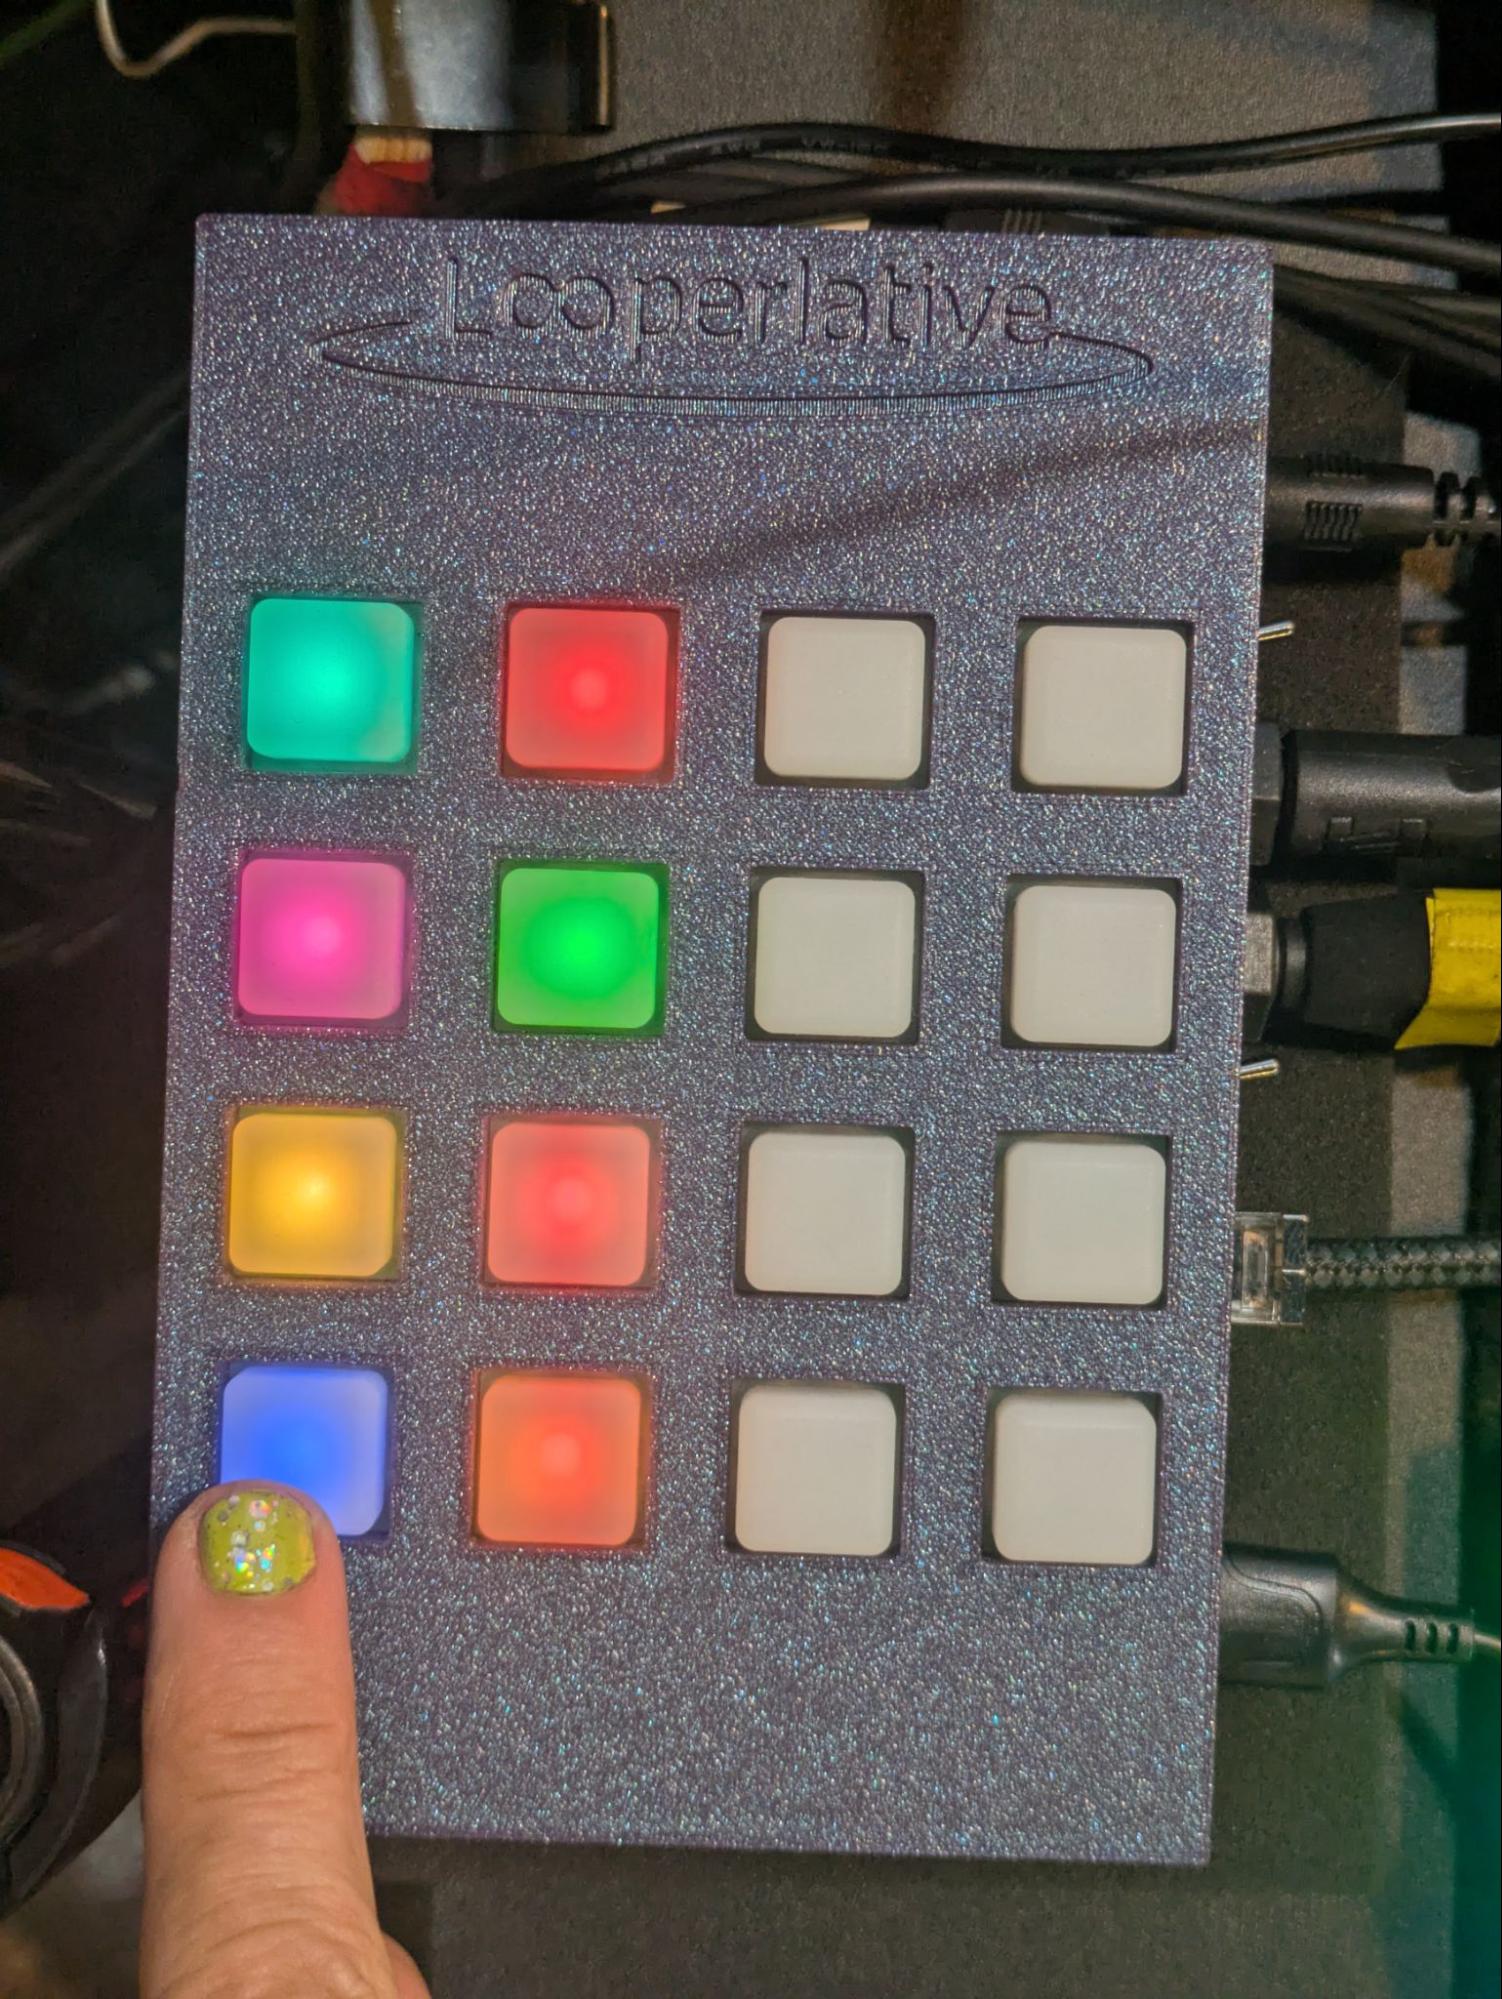
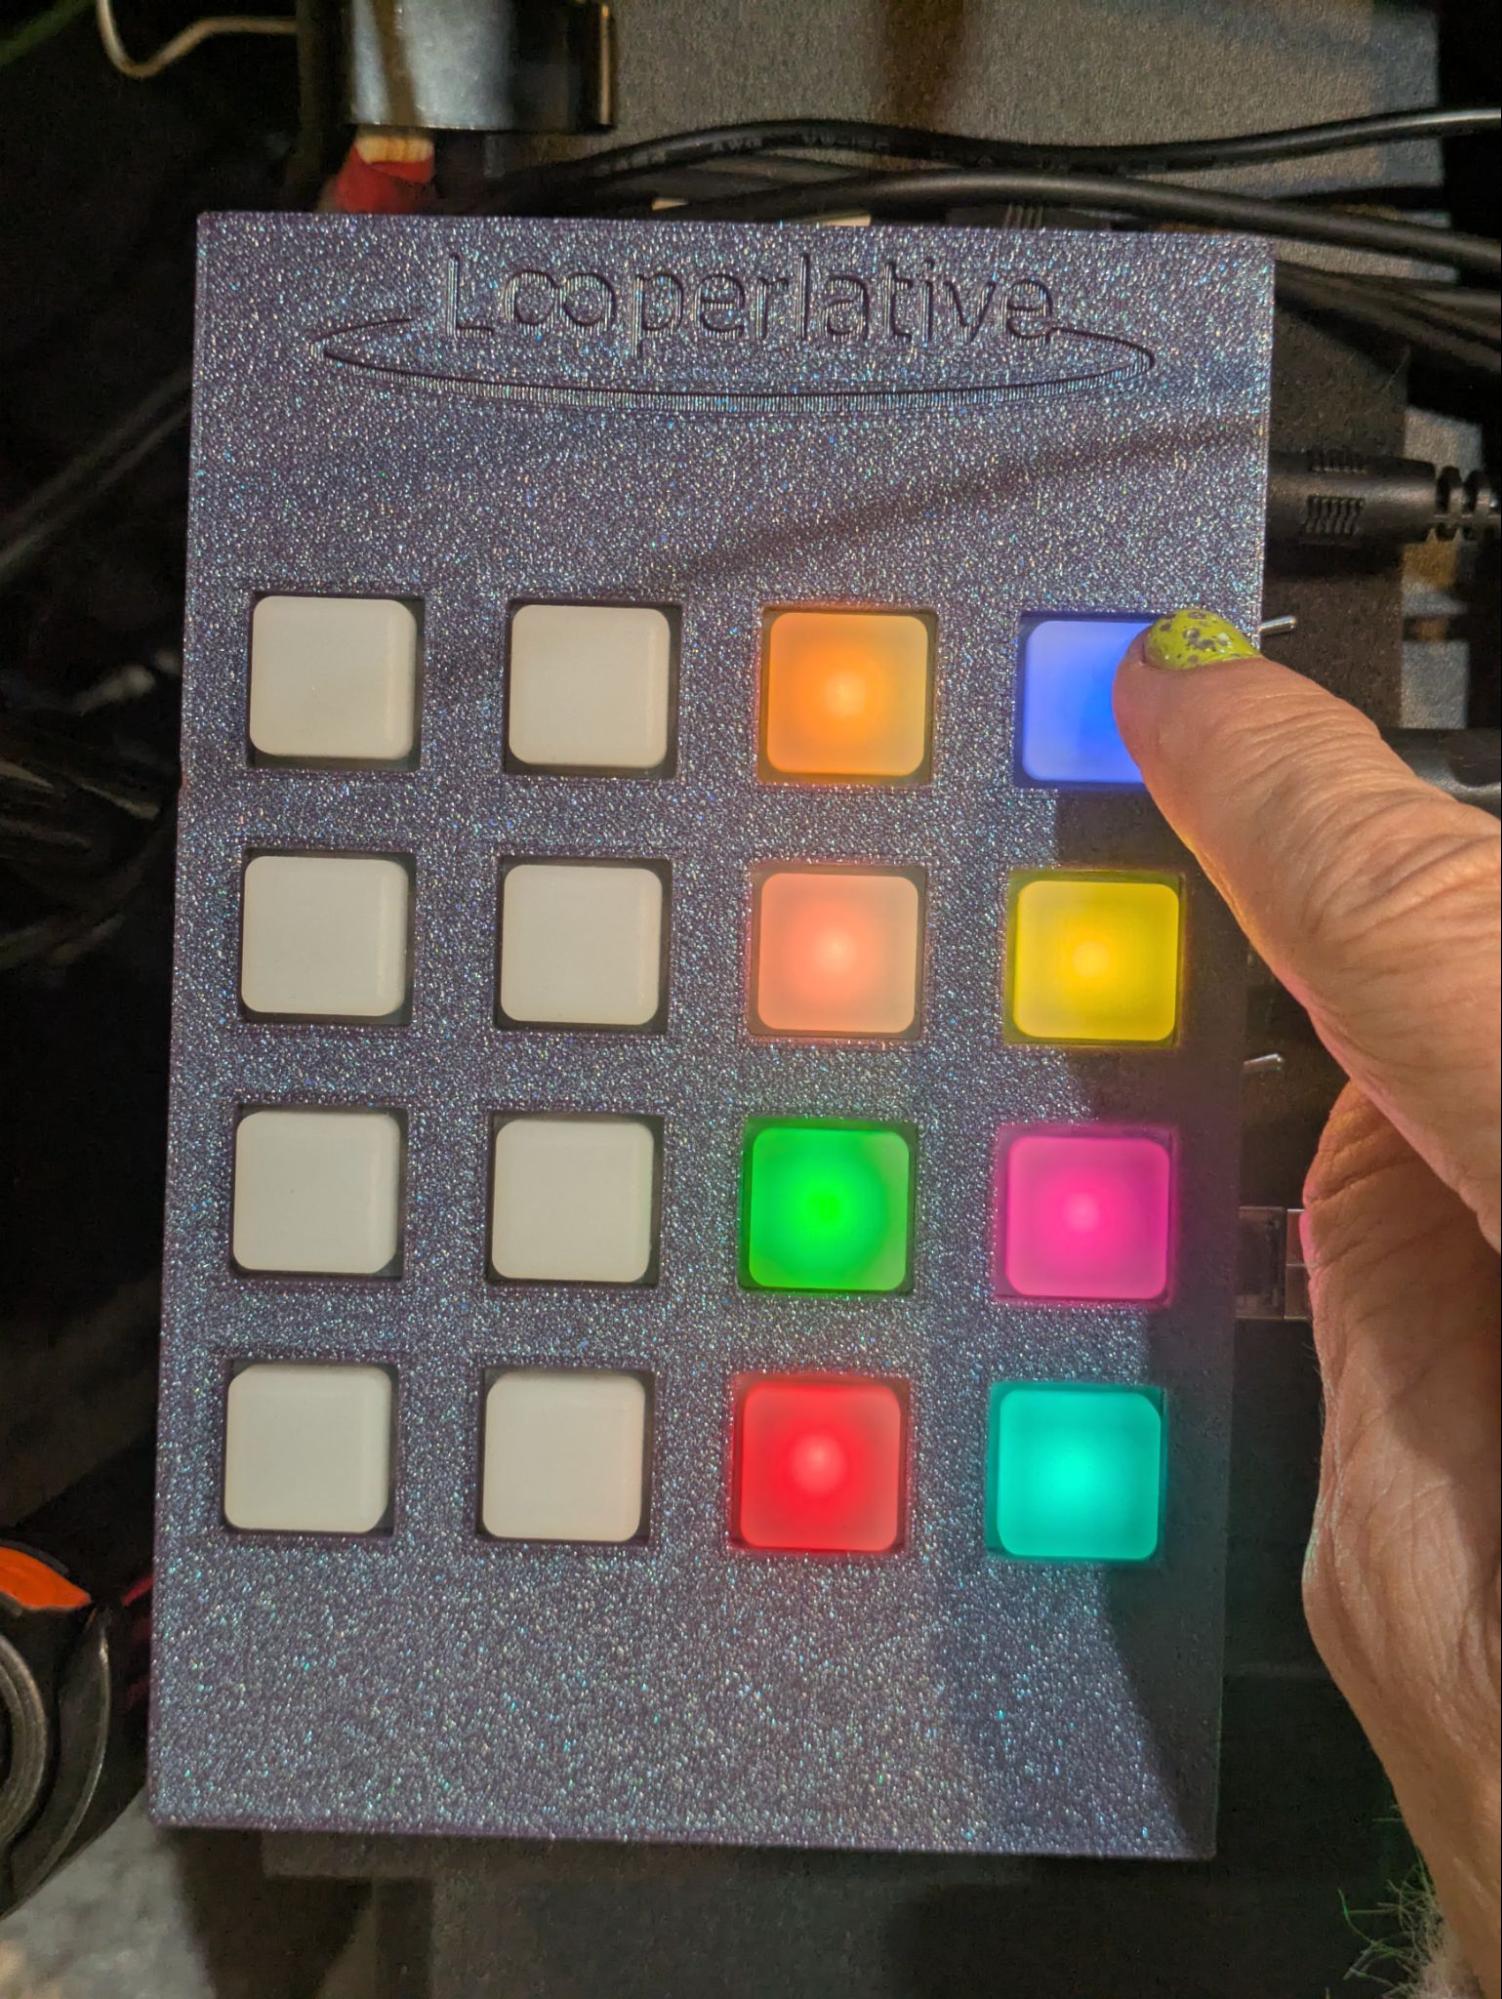
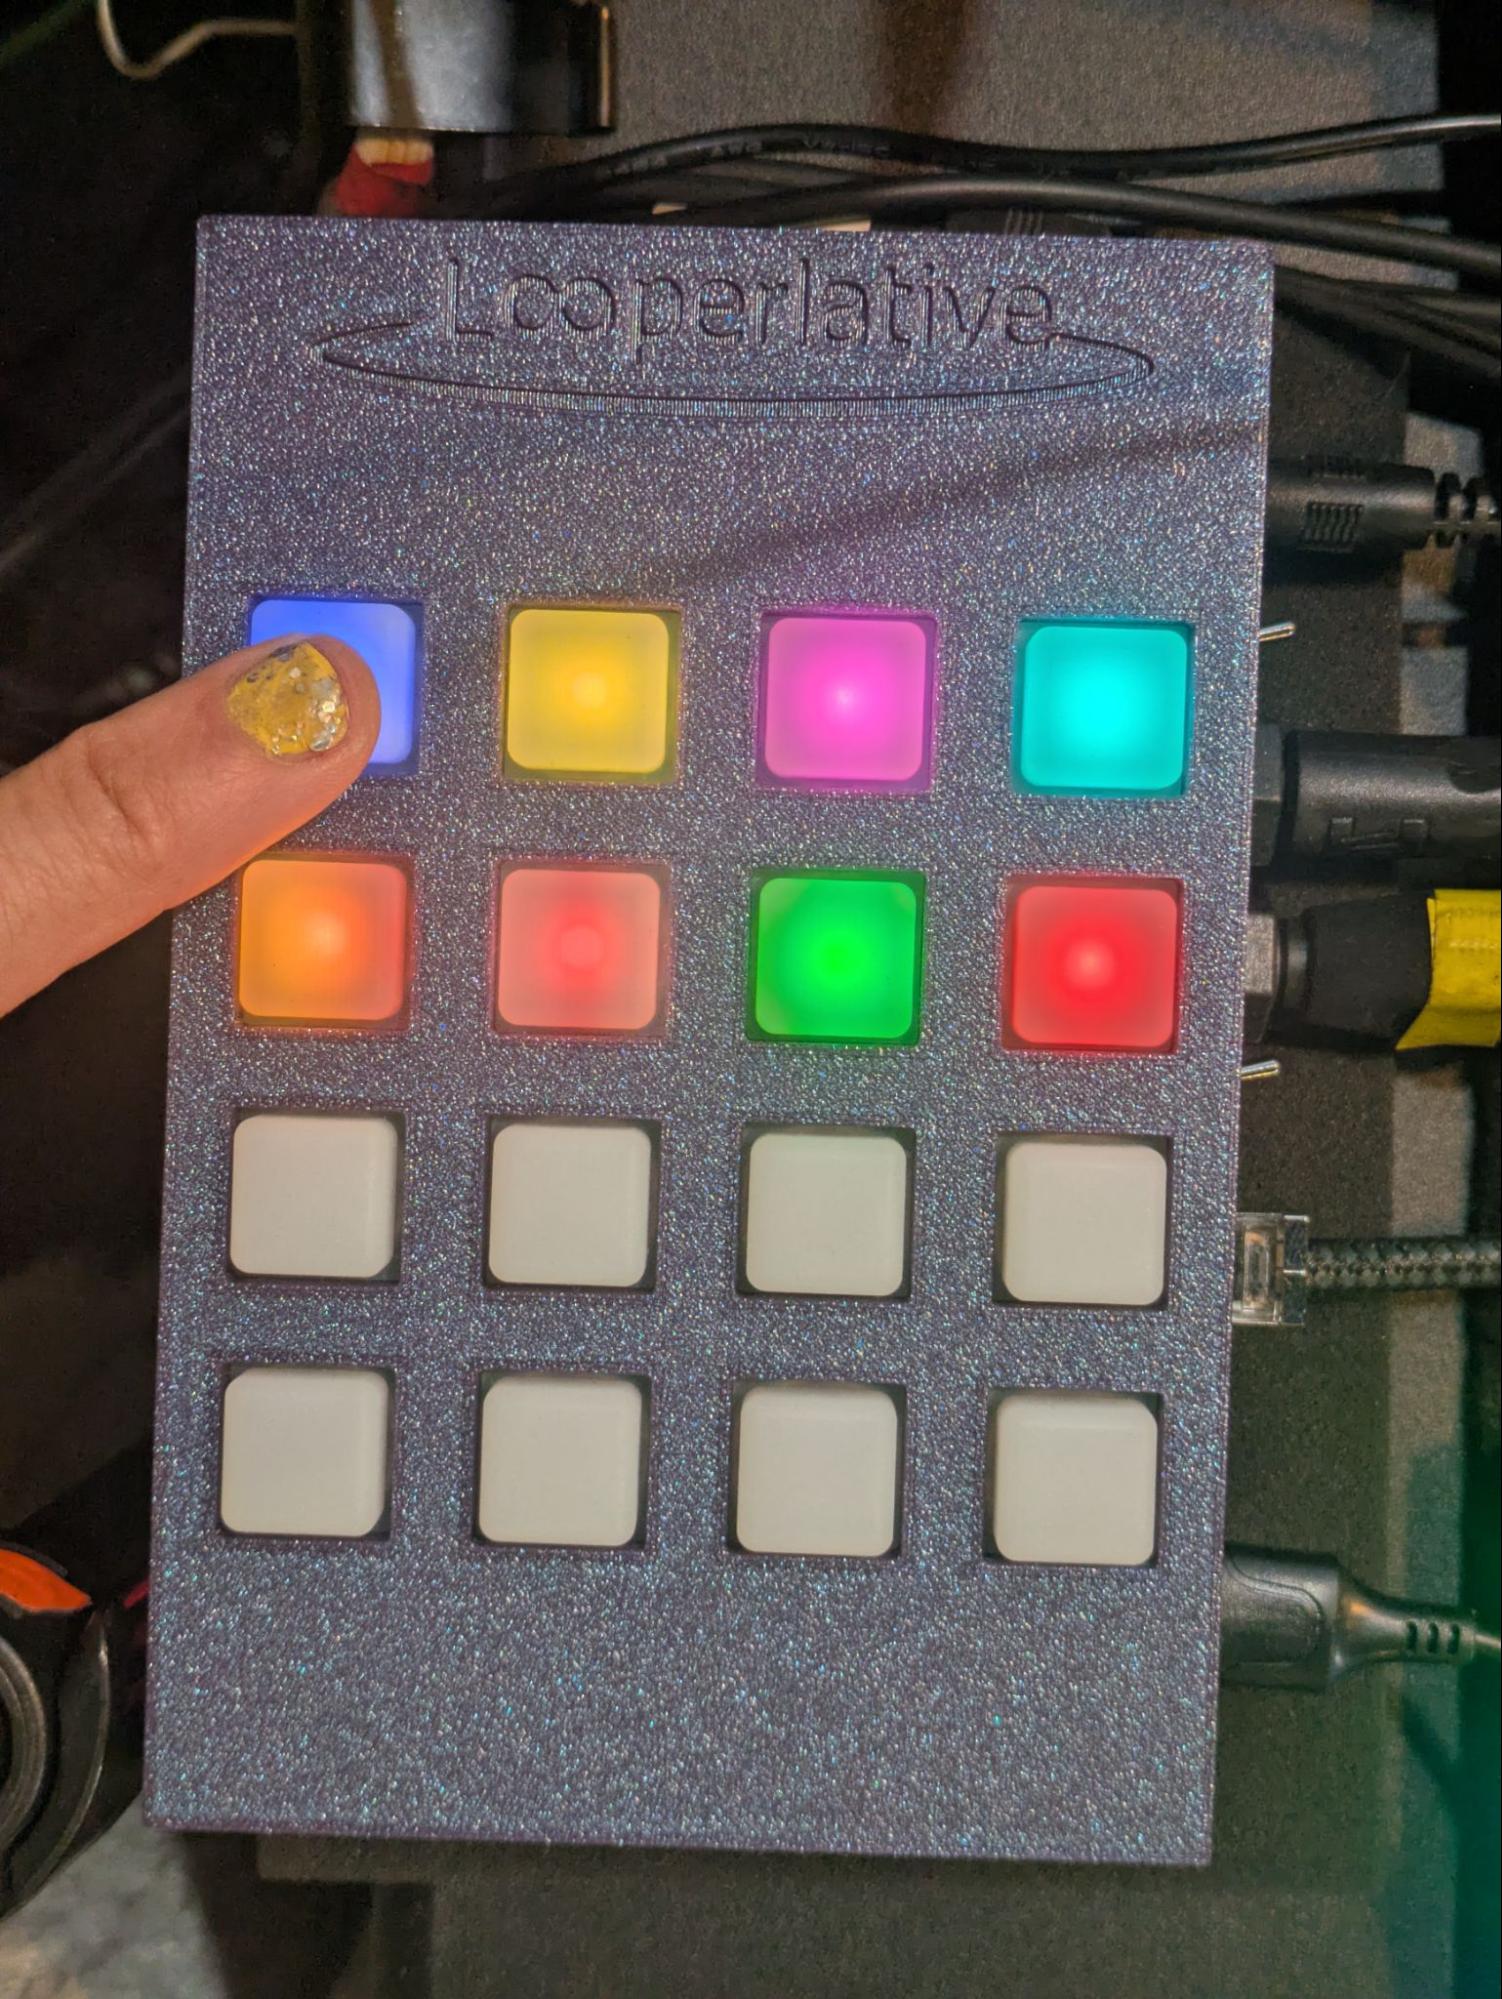
Bottom Left Right Top
When you’ve loaded a color preset group, pressing the lower right button will return the display to the eight color LED’s so you can navigate to other color bank preset groups.
PLUG IT IN:
Let’s start with a simple connection so you can hear yourself looping as quickly as possible.
First, connect the power jack to the supplied power supply (wall-wart). Use only the supplied power supply to ensure proper power and so as not to damage the Loop Pad by using an incompatible power supply.
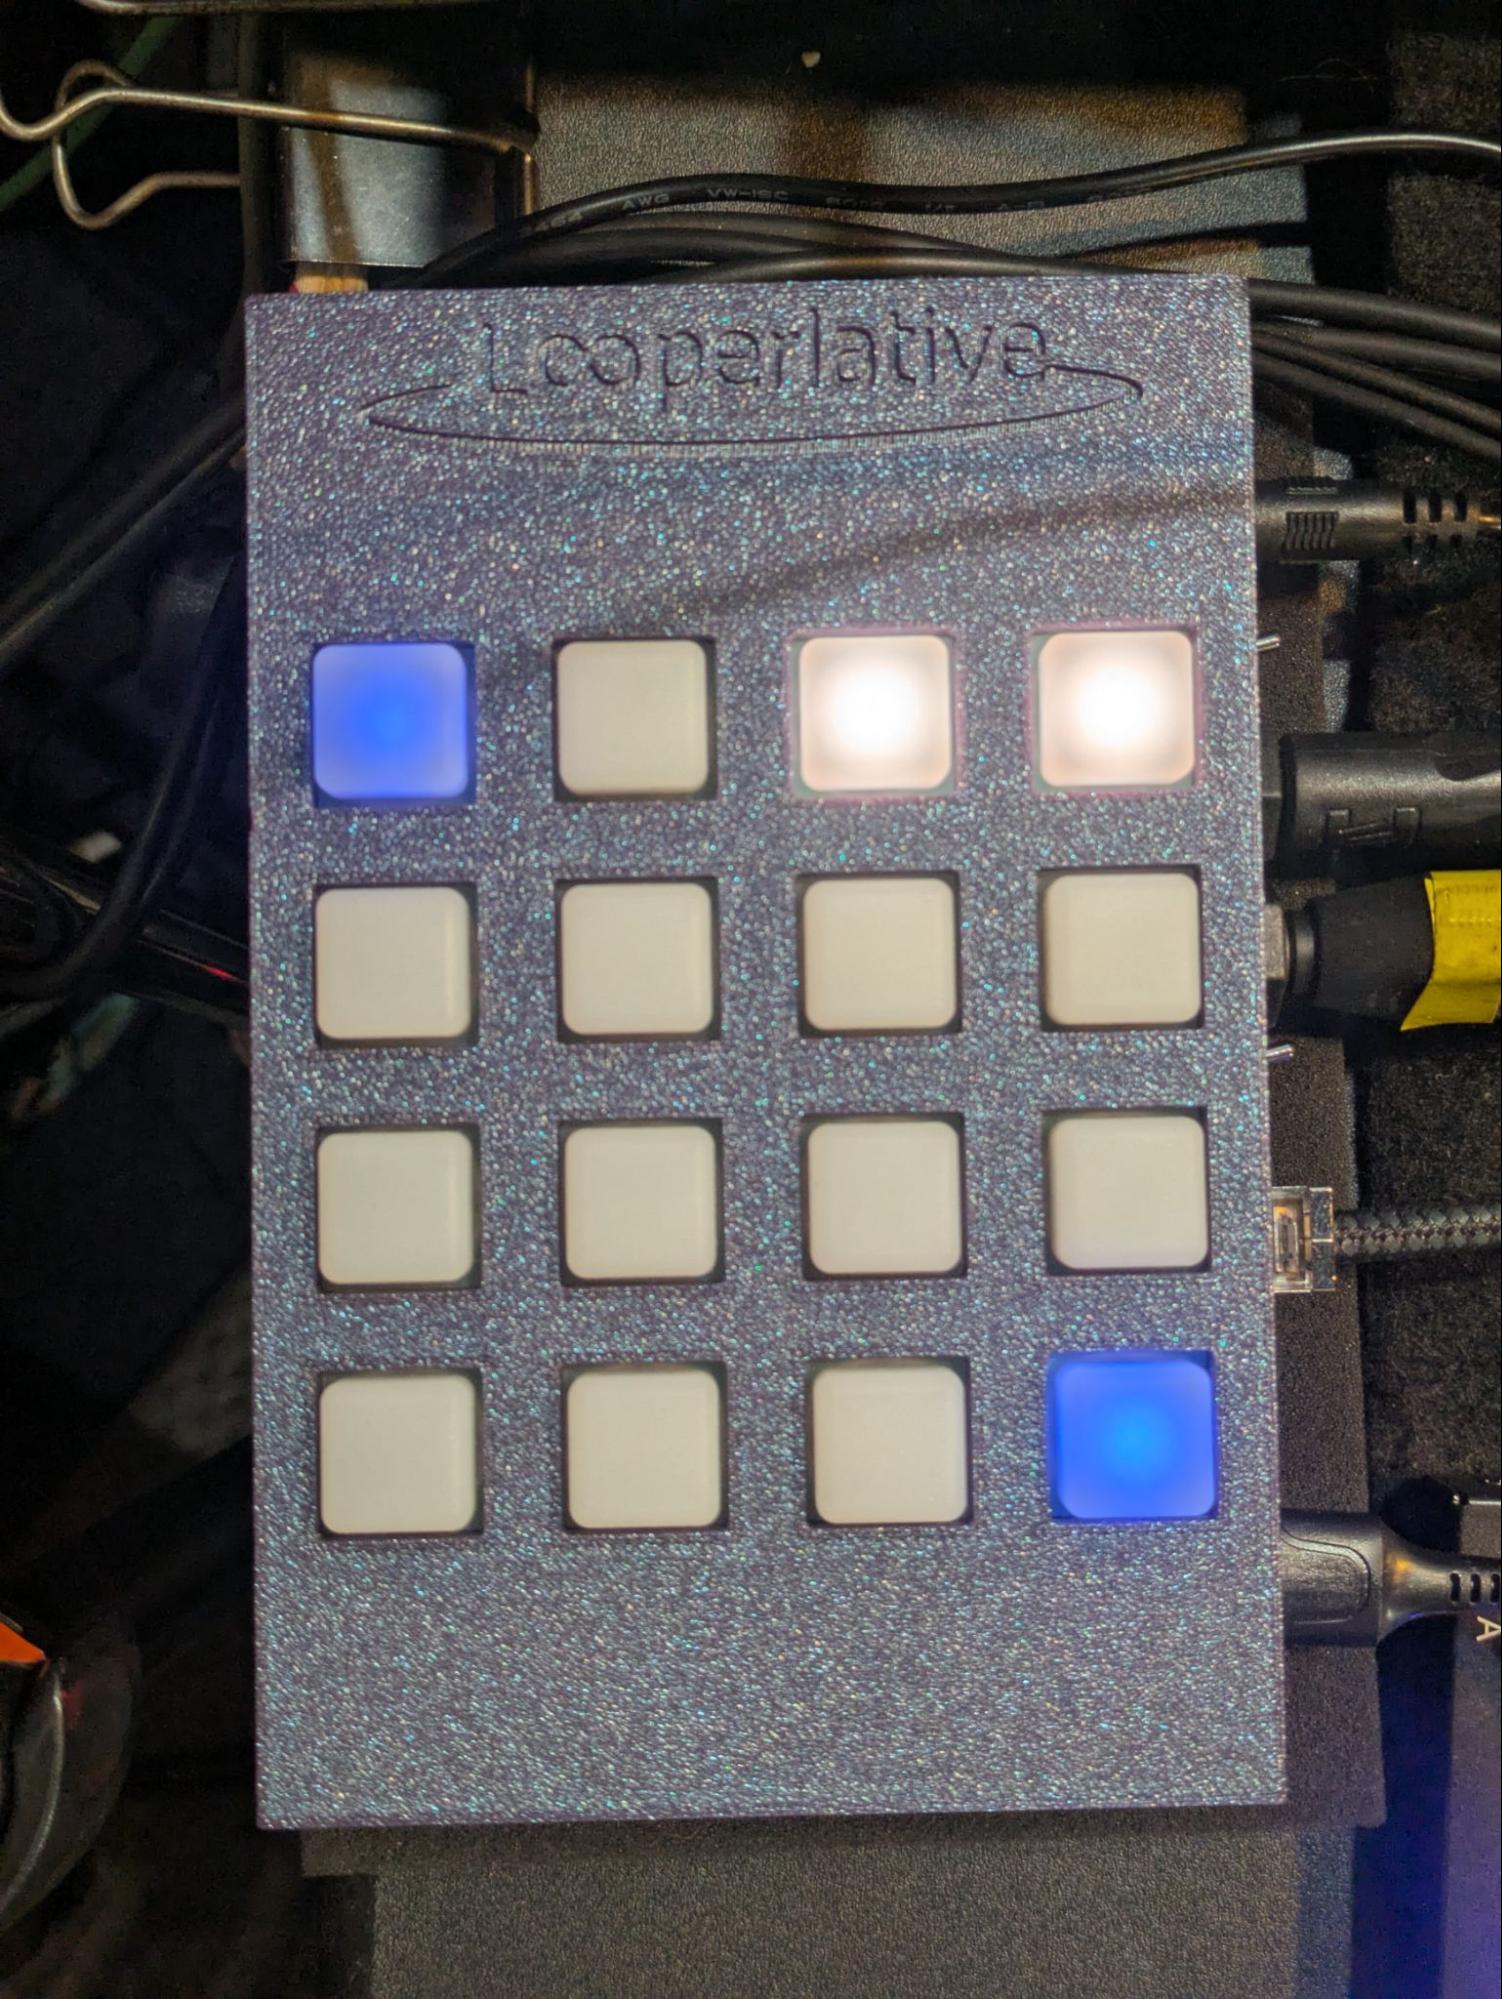
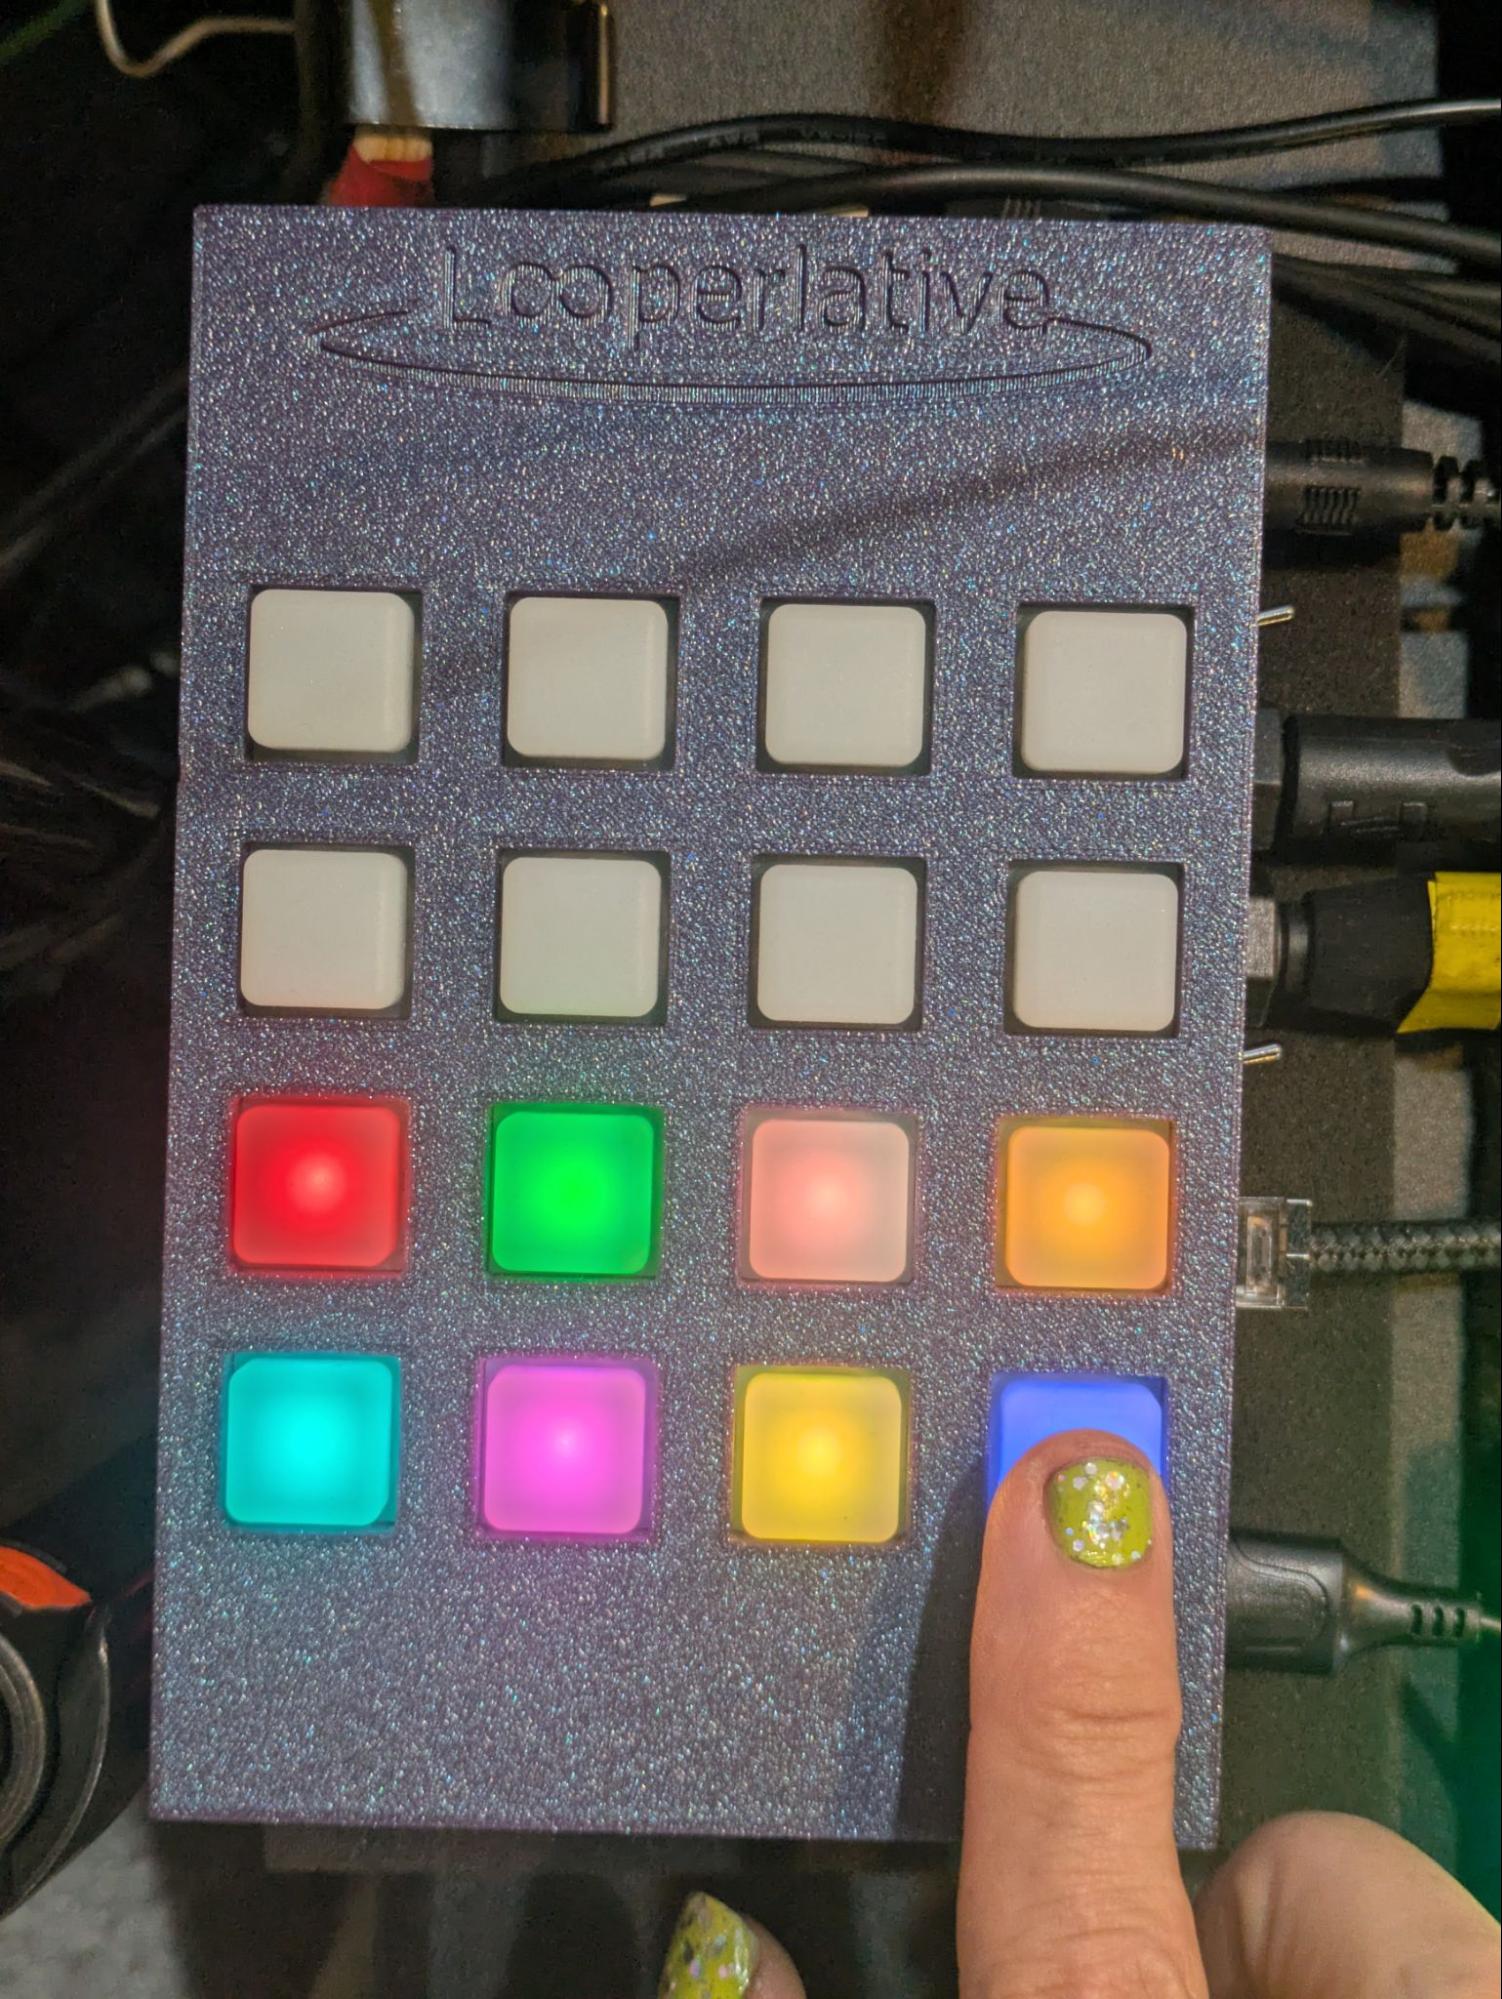
The Loop Pad takes 20-30 seconds to power up. When the lights are lit as shown in the image, the Loop Pad is ready to use and to be connected to the app.
Connect Using A Direct Sound Source:
You can go direct from your instrument/mic/effects/interface into the Loop Pad, and out to an amp or powered speaker. Sending both Dry and Wet signals together is most useful when you’re connecting an instrument directly to the Loop Pad without a mixer. (see below)
Connect Using A Mixer:
The use of a mixer is not required, but it will allow you to send the signal of multiple devices to the Loop Pad in stereo.
To utilize a mixer, connect the left and right Aux Sends or Sub Outputs of your mixer to the stereo Input of your Loop Pad. Next, connect the stereo output of the Loop Pad back into your mixer Aux Returns or to a Channel, which then sends the signal to your monitors or headphones.
NOTE: If you send the Loop Pad output to a channel on your board, make sure that channel isn’t bussed to send signal back to the Loop Pad through the Aux Sends or Sub outputs.
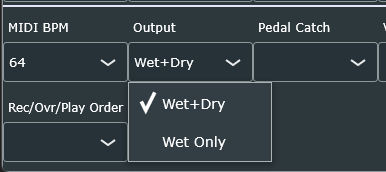
By default the Loop Pad sends both Dry and Wet signals through the output jacks. In the Configure app’s Main Tab, you can change the settings so that it only sends the Wet signal, when using a mixer, you don’t want to double the volume of your dry signal by having the dry signal in two channels.
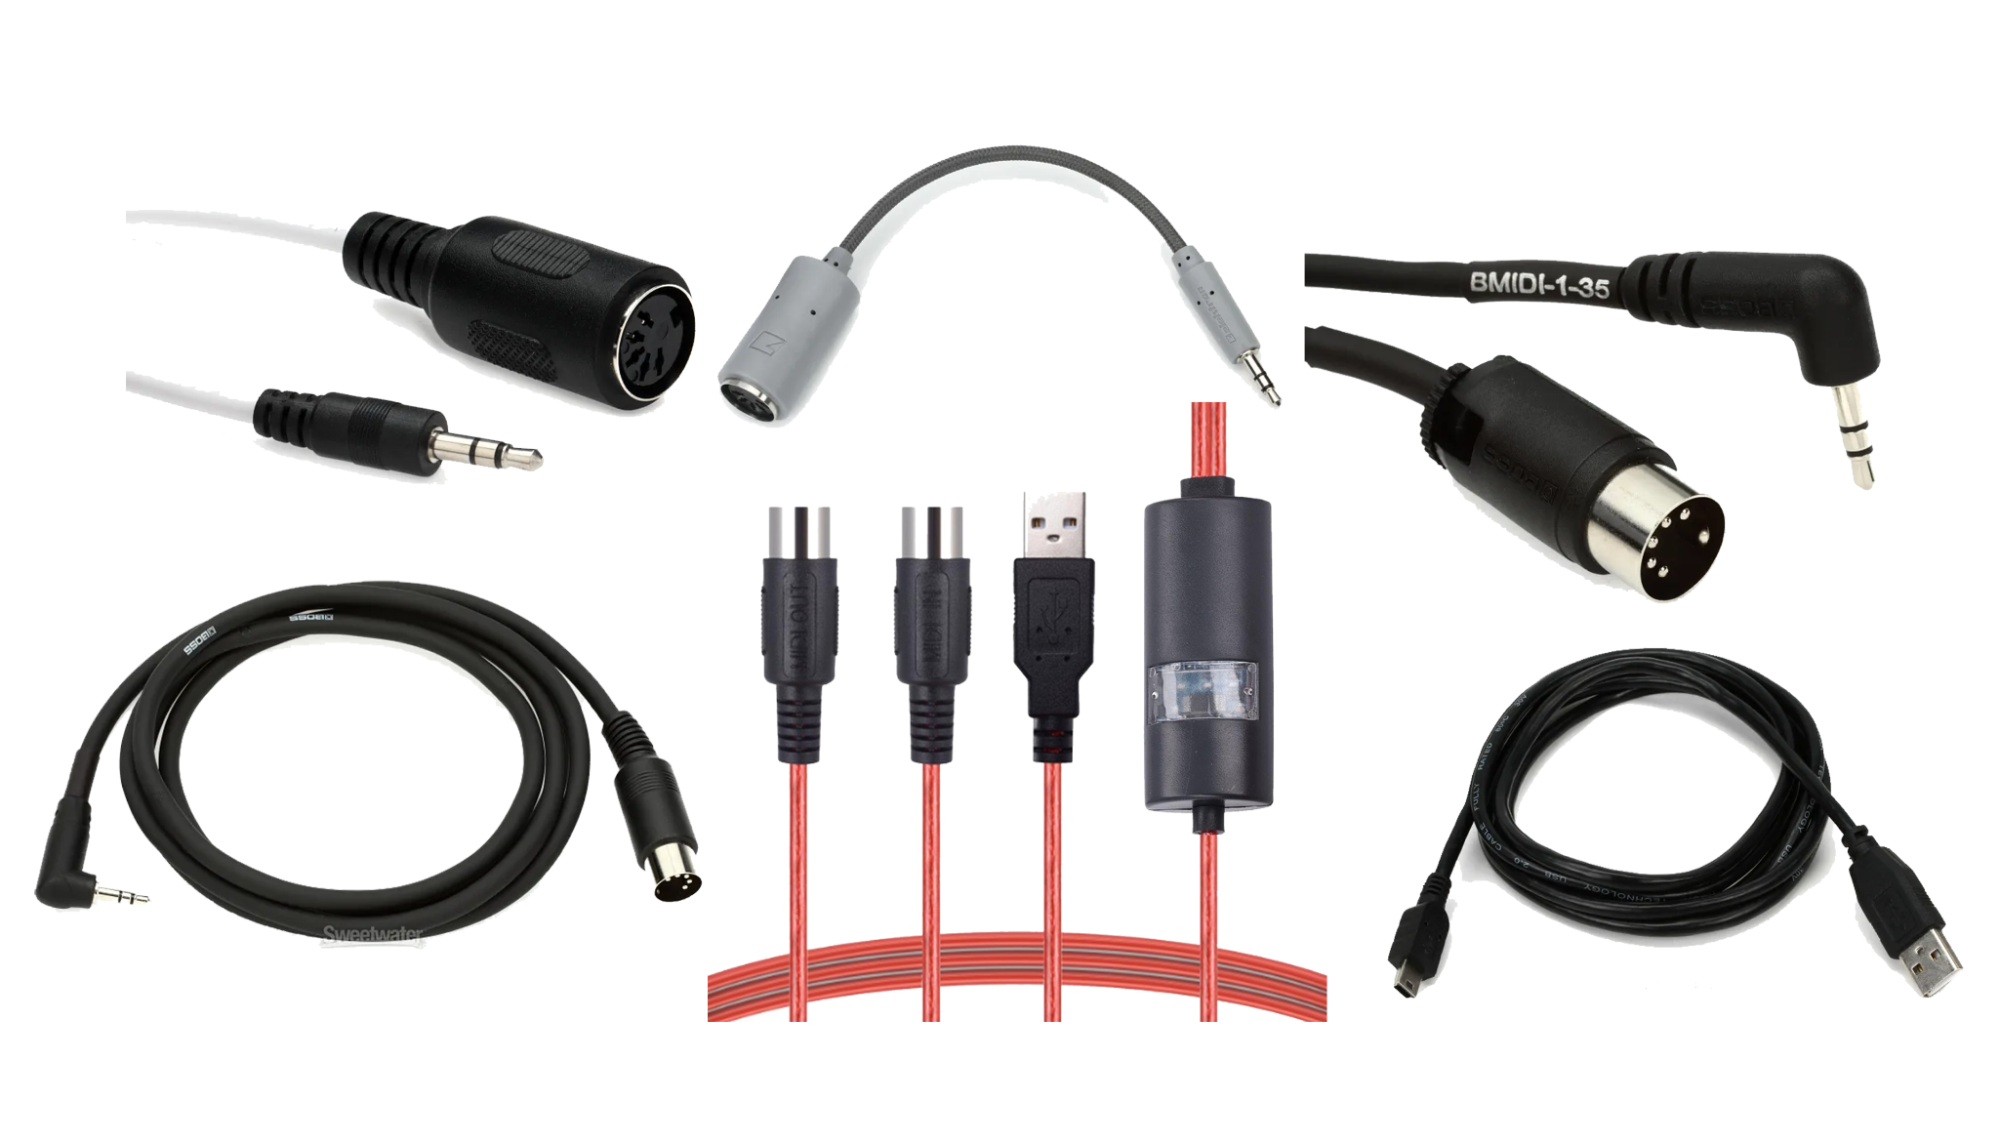
If you’re using a foot controller or an expression pedal that gets plugged into one of the USB ports, you can use a 5-pin-to-USB or an ⅛” TRS-to-USB MIDI converter to connect controllers that don’t have native USB MIDI.
Examples of various 5-pin, 1/8" and USB MIDI adapters
You can connect the Loop Pad to your computer using the wireless connection method, or you can connect your Loop Pad ethernet to your studio router or a computer that has an ethernet port or using an Ethernet or Ethernet-to-USB cable.
Note that you do not need to connect USB or Ethernet devices to use the Loop Pad but you do need to connect to the Configure app to customize the configuration of your Loop Pad.
Let’s check the Looperlative Configure app. If you’re connected with an Ethernet cable, the app will show the software version on the right near the top and the firmware information in place of the ‘connection lost’ text on the left of the app screen near the top. This is how you know you’re connected.

To connect wirelessly, the first step is to hold down the lower right blue button for five seconds. Holding the button enables a router mode that allows the computer to talk to the Loop Pad. The computer repeatedly sends out a message searching for the Loop Pad until the Loop Pad responds.
When using ethernet, you don't need to hold the button.
To use the wireless connection, open the network connection utility on your computer, like you do when connecting to an internet provider, and find the network “LoopPad” and connect to it like you would connect to any other network. Your computer will ask for a password the first time that you connect. Use the password “looperlative”. After a few moments, the ‘Connection Lost’ text on the app should change to show the app and firmware version information once communication is established.
Be careful to watch the input level on your mixer or device sending audio to the Loop Pad. You want a healthy signal without clipping, if you hear distortion, bring the source level down until the distortion is gone. You can also use the toggle level switches on the side of the Loop Pad to cut or boost levels.
FIRST APP SCREEN:
The first screen you see on start up is the Main screen where you view and configure the Loop Pad
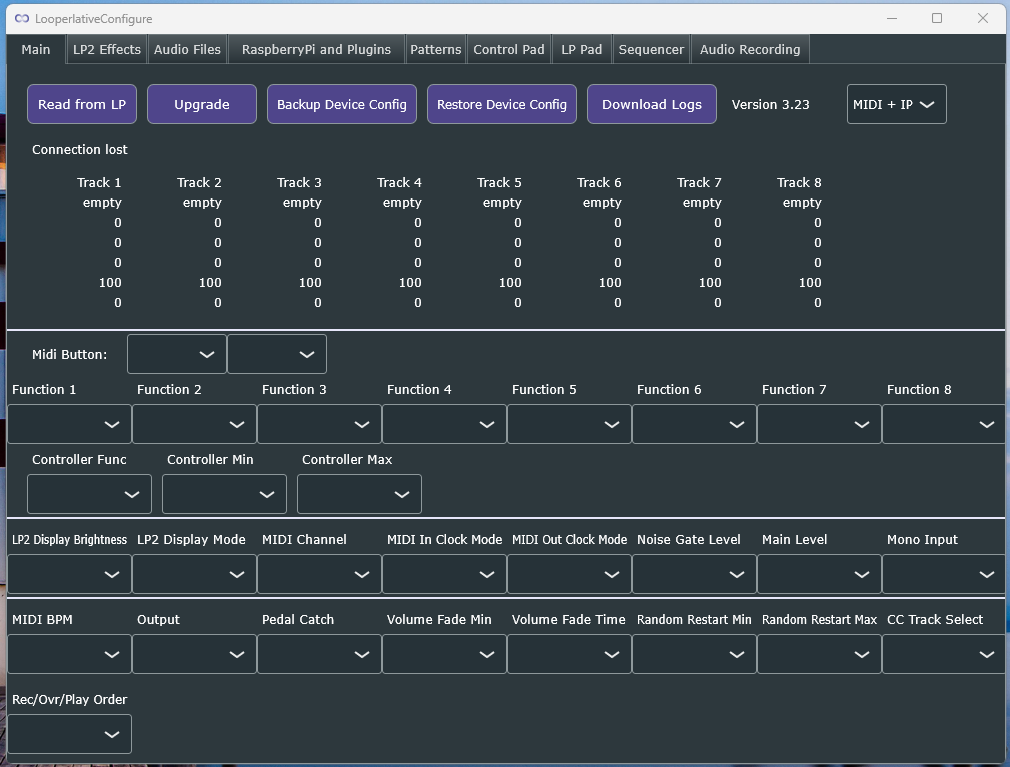
Default Configuration:
The Loop Pad has 8 preset groups, each represented by a different color. The default preset group that loads on startup is the Blue group.
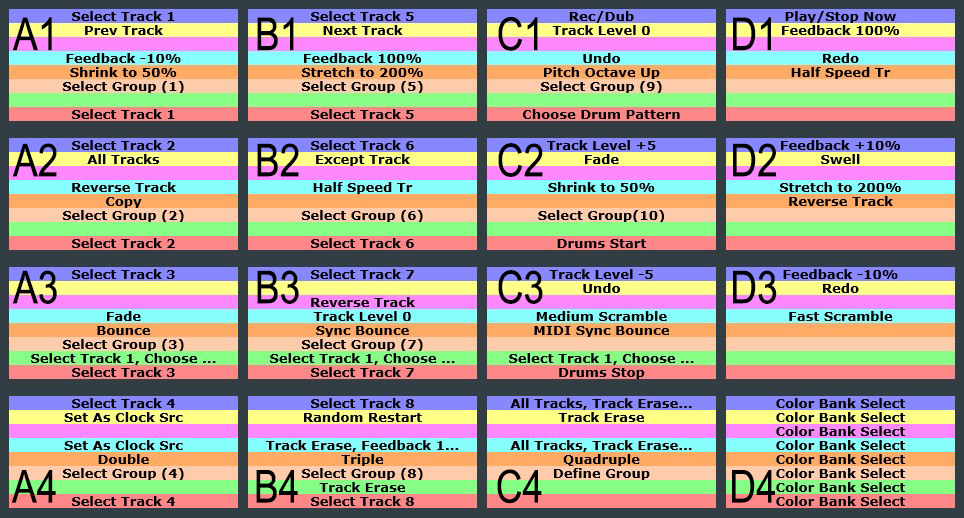
Preset defaults by color group that comes loaded into your Loop Pad
This Blue preset group includes a button to Select each track using the left two columns for Track 1 through 8.
So in Column A, top to bottom, the buttons Select Track 1 through 4.
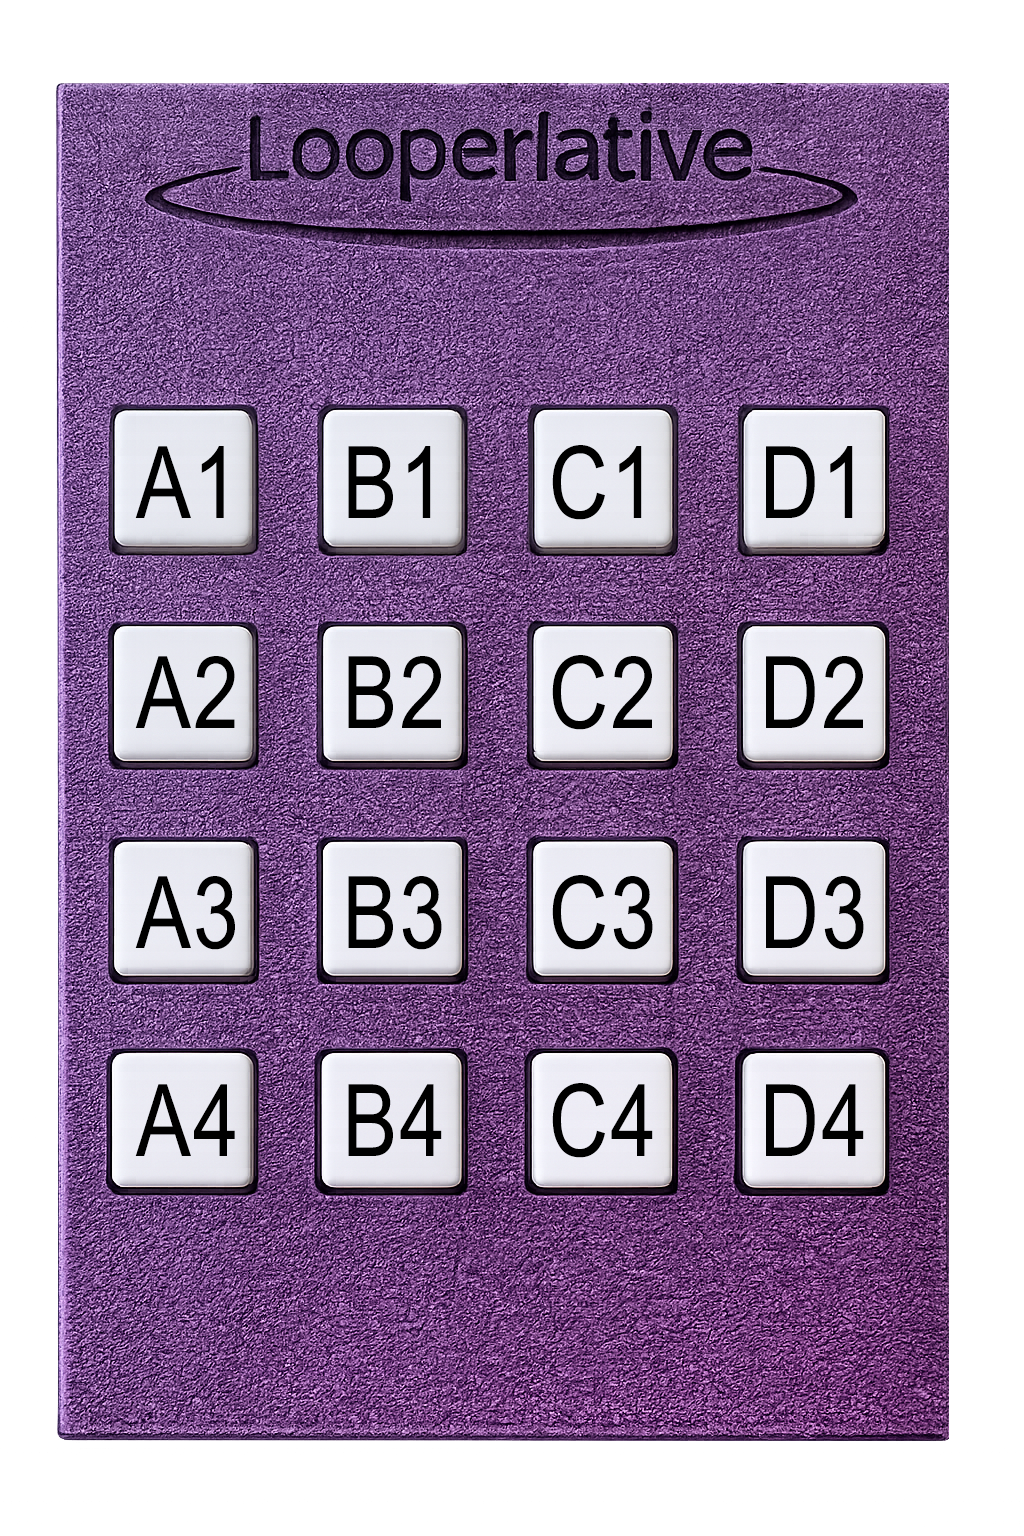
In Column B, top to bottom, the buttons Select Track 5 through 8.
The other buttons in the Blue preset group are as follows:
Column C, top to bottom:
- The first press of Column C button 1 engages Rec/Dub and immediately starts Recording on the currently selected track. Press that button again and that track goes into Overdub, for layering additional sounds onto that track. And a third press puts that track in Playback.
In the lower left area of the app, the behavior sequence can be changed to be Record/Playback/Overdub if that better fits your style intent, meaning the first press starts Record, the second press engages Playback and the third press engages Overdub.
- Column C button 2 sets the Track Level to +5, which boosts the Volume by a +5 increment for each button press on the currently selected track, up to the maximum value of zero.
- Column C button 3 sets the Track Level to -5, which decreases the Volume by a -5 increment for each button press on the currently selected track, down to the minimum value.
- Column C button 4 is configured as a multi-function button which selects All Tracks, then engages Track Erase on all tracks, it then resets Feedback to 100 and restores full Volume, which is represented numerically as ‘0’, it then Selects Track 1 and then engages Set As Clock Source for Track 1.
So to repeat for clarity, a multi-function preset allows multiple functions, up to eight, to be grouped into one button press. This specific Column C button 4 effectively clears the Loop Pad and resets it to be ready to record on Track 1.
It’s important to point out where in the app screen that you can program a button to have up to 8 function presets.

Column D, top to bottom:
- Column D top button 1 engages Play/Stop Now. If a track is in Playback, this will stop it instantaneously with the button press. If the track is stopped, pressing this will engage Playback on that track instantaneously with the button press.
- Column D button 2 engages Feedback plus 10%. If you have set a negative Feedback value, which is a destructive gradual reduction of the recorded audio until the track becomes blank, then pressing this button will increase Feedback. For instance, if you’ve hit the Feedback minus 10% three times, which is a combined Feedback reduction of 30%, then hitting this button will bring that Feedback reduction back up. It’s important to note that Feedback is different from Fade. Faded tracks can be brought back up in level because only the volume is decreased but with Feedback, the recorded audio signal is actually destructively lowered by the percentage you’ve set. If negative Feedback is used to reduce the audio to eventual silence, the track cannot be brought back up to 100%. Plus Feedback only reduces the % of level destruction.
- Column D button 3 engages Feedback minus 10%. As we’ve just explained Feedback versus Fade, pressing this button causes a 10% destructive Feedback rate. Multiple presses increase that negative feedback rate up to 100%
This can be set during Playback or Record and essentially, when used during record, this will gradually reduce the volume of previously recorded sound while you add new sound.
Think of Feedback on a typical delay unit, it sets a subsequent amount of delay repeats and how quickly the signal disappears, while continuing to record new input, or letting it play out
- The Column D button 4 is the same in each color preset group. Pressing this button toggles through the various color preset groups and allows you to change the orientation of the button layout. As mentioned earlier, depending on how you set up your Loop Pad, you may need to change the orientation of the buttons to accommodate your cabling footprint. Press this multiple times and you’ll see how it works.
This button also allows you to access the other color preset groups, so, let’s say you’re in the Blue preset group and you want to access commands in another color preset group. Press this button, select the color of the group you want to access and that will load that color preset group.
CREATE A LOOP
Record An Asynchronous Loop:
Using the default configuration that ships with the Loop Pad, let’s record your first loop.
Step one: Select track one if it’s not already selected, the button will turn blue
Step two: tap the Rec/Dub button, Column C button 1, once to start recording. The track 1 button turns red and flashes
Now play or sing your phrase, and when you reach the end of the idea, tap again to close the loop and go into Overdub.
The track 1 LED turns green and continues flashing in Overdub mode.
It flashes amber ¾ of the way into the loop and then flashes blue to mark the beginning of the loop. When using a clock or sync source to trigger loop start/stop, the amber flash is on the last beat and the blue flash marks the beginning of the loop. We’ll cover this in a later video.
As previously mentioned, the default Record tap sequence is First Tap equals Record, Second Tap equals Overdub, Third Tap equals Playback.
But as mentioned above, in the Configure App, you can change that sequence to Record > Playback > Overdub if that is your preference.
Tap the same button a second time and now you’re in Overdub. Play or sing a second layer—a harmony, a texture, or a simple accent.
Step three: Now tap once more to leave overdub and enter Playback. The loop keeps playing, but you’re no longer recording. The track button stays green and stops flashing.
To stop the loop, use the Play/Stop control - Column D button 1. Once you’ve stopped the loop, the track 1 LED turns solid red to indicate it has material recorded on it.
It’s important to note here that some Play/Stop commands will play or stop at the press of the button whereas other Play/Stop commands will wait for the sync source, or the beginning or end point of the loop. This specific button is set to act simultaneously with the button press. We’ll go over those different start/stop modes later.
Now that you’ve stopped your loop using the Top Right button, press it again to restart Playback.
Record A Second Asynchronous Loop:
(We’ll cover syncing tracks internally and syncing tracks to an external clock source in deeper dive tutorials.)
Select track two by pressing Column A button 2, the selected button lights blue.
Let’s add a second track that’s not sync’d with the first.
Now tap the Rec/Dub button, Column C button 1, to start Record mode, then play or sing a phrase, then tap to close the loop and enter Overdub mode, you can add more audio here or press it again to enter Playback mode.
Now both tracks are playing. You can stop, delete or restart each track independently to shape your arrangement.
Depending on the specific ‘start/stop’ function type that is programmed, you can start or stop individual tracks or start or stop them all, you can stop at the loop end or at the press of the button.
LOOP PAD 16 LED BUTTON CONTROL SURFACE:
The sixteen multi‑colored pads are where Loop Pad really comes alive. Each color tells you what preset group you’re using, and there is also a blink pattern when syncing to an external clock, when the Loop Pad is waiting for the start of sync source - and the color of a track button indicates the state that track is in, either record, overdub, play, blank or stopped.
You can assign the pads to select tracks, start and stop loops, undo, erase, and trigger special functions.
The idea is that you can play Loop Pad like an instrument, not just a recorder.
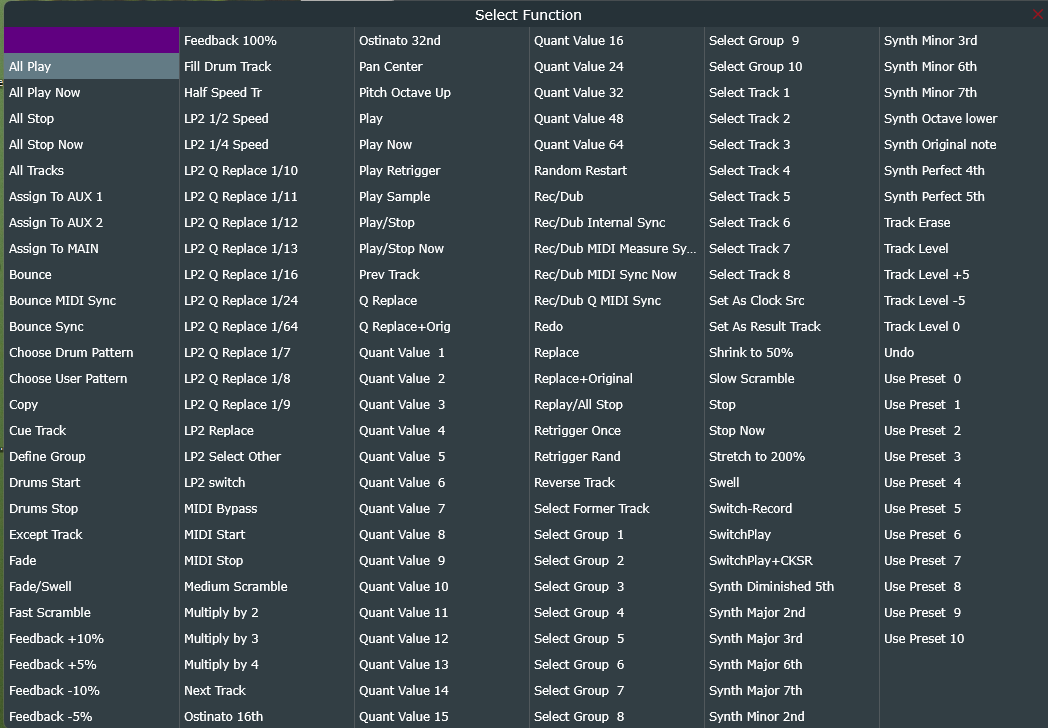
Below is the list of functions that can be assigned to the Loop Pad buttons or to external controllers (a/o 06-16-26).
APP TABS OVERVIEW:
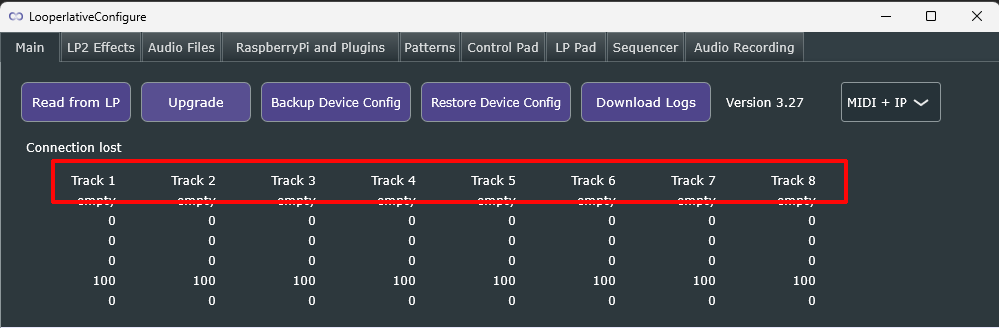
Let’s take a quick look at the Loop Pad app that’s running on my computer. You’ll notice there are 9 tabs. We’ll go over each in detail later on, but to summarize:
The Main tab is where you can see and connect your device to the app, upgrade, save and load configs, set up your controllers and pad presets, set up device defaults and observe individual track behavior in real time.
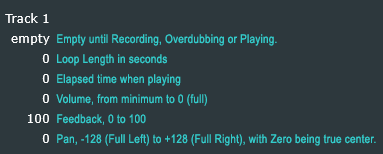
The values shown for each track under their track number are as follows, from top to bottom per track:
- The first value is Empty until you are Recording, Overdubbing or Playing.
- The second value is Loop Length in seconds
- The third value shows elapsed time when it’s playing
- The fourth value is volume, from minimum to 0 (full)
- The fifth value is Feedback, 0 to 100
- The sixth value is Pan, from minus 128 (Full Left) to plus 128 (Full Right), with Zero being true center.
The additional settings that are shown in this tab are, starting with the first row of dropdown menus under the white line:
Midi Button
Used to assign an incoming midi command or Loop Pad button press to a functions or set of functions
- First column allows midi command type selection between Program Change, CC, Note, or a Loop Pad button (DAW explained later)
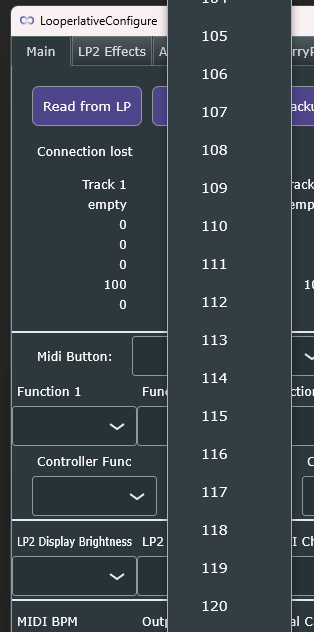
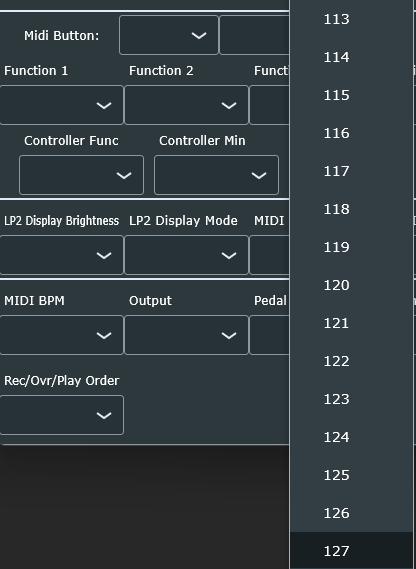
- The next column allows selection of the midi command or Loop Pad button number, from 0 to 127.
The second row of dropdown menus:
Function 1- 8
- This is where you choose the function or functions that you want associated with the specified midi command. Up to eight functions can be assigned to a single command. (The full list of the functions that can be assigned appears later in this resource: here.)
The third row of dropdown menus are:
Controller Settings
- Controller Function
- Controller Min
- Controller Max
This is designed for external hardware controllers like knobs and expression pedals to map to controller functions. (The full list of the functions that can be assigned appears later in this resource: here.)
Under the next white line we have these settings:
LP2, MIDI, Gate, Level, Mono/Stereo
- LP2 Display Brightness - pertains to LP2 only
- LP2 Display Mode - pertains to LP2 only
- Midi Channel - 1 through 16
- Midi In Clock Mode - Choose ‘Allow’ or ‘Ignore’
- Midi Out Clock Mode - Choose ‘On’ or ‘Off’
- Noise Gate Level - Choose ‘Off’ or values 9, 10, 11 or 12
- Main Level - All integer values from minus 4 to plus 4
- Mono Input - Choose ‘Stereo’ or ‘Mono’
Under the next white line we have these settings:
Bars, Output, Catch, Volume, Randoms, CC Select
- Midi BPM - In this case, BPM stands for ‘Bars Per Measure’ and the values are from 3 to 64
- Output - Choose Wet plus Dry or Wet Only
- Pedal Catch - Choose ‘Off’ or ‘On’ - Pedal Catch ‘Off’ means the value will jump from where it was previously to where the pedal is at when it is moved, meaning it can be an abrupt jump. ‘On’ means that the pedal will only change the value once it matches where it was previously.
- Volume Fade Minimum - sets the lowest volume value that fade will go down to. By default, this number is -128 but a value near -60 is often better
- Volume Fade Time - 1 to 99 - controls how fast the track will fade or swell (explained in a future video)
- Random Restart Minimum 0 to 5 and Maximum 1 to 20 - triggers a track to play once, then pause for a random amount of time before playing again. After each playing of the loop, the pause length is randomly chosen resulting in a track that plays at unpredictable times. To turn off random restart, you must use a stop function on the track.
- CC Track Select - On or Off - Using a continuous controller, ON means the knob or pedal change will also make the track being changed the selected track. OFF means a knob or pedal adjustment will not change what track is selected.
- Record > Overdub > Play Order - Sets Record button order from Record then Overdub then Play (default) or Record then Play then Overdub
The LP2 Effects tab only pertains to the LP2 device.
The Audio Files tab is where you can load and manage audio files that you want to save to the device for triggering. (explained in a future tutorial)
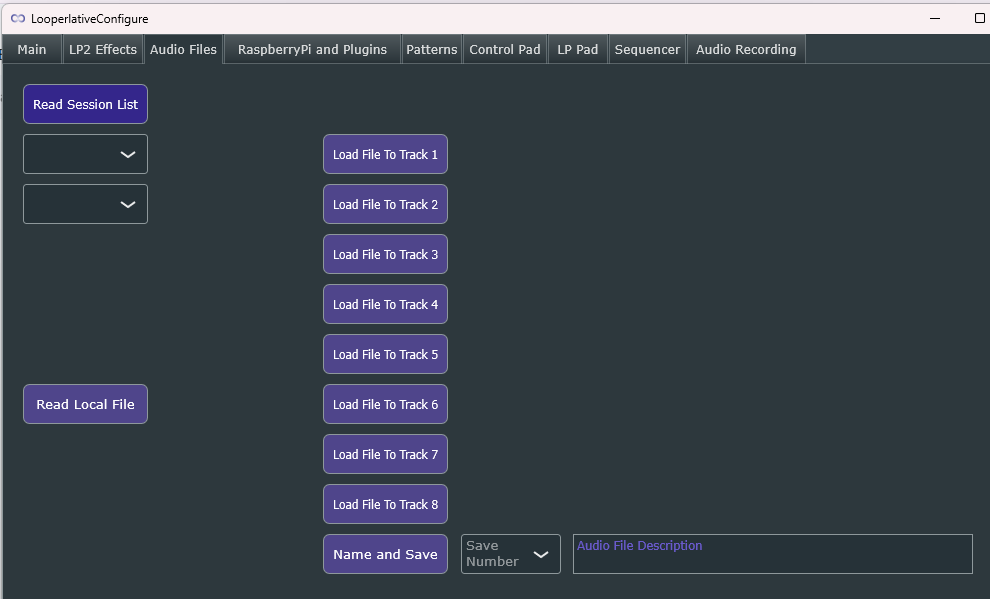
The RaspberryPi and Plugins tab pertains to that device only. In this tab, Loop Pad users are not required to license/register the device. Every Loop Pad is automatically licensed.
The Patterns tab is for building patterns. You can have up to 8 patterns with up to 64 steps each. These patterns can be triggered using a Midi command. (explained in a future tutorial)
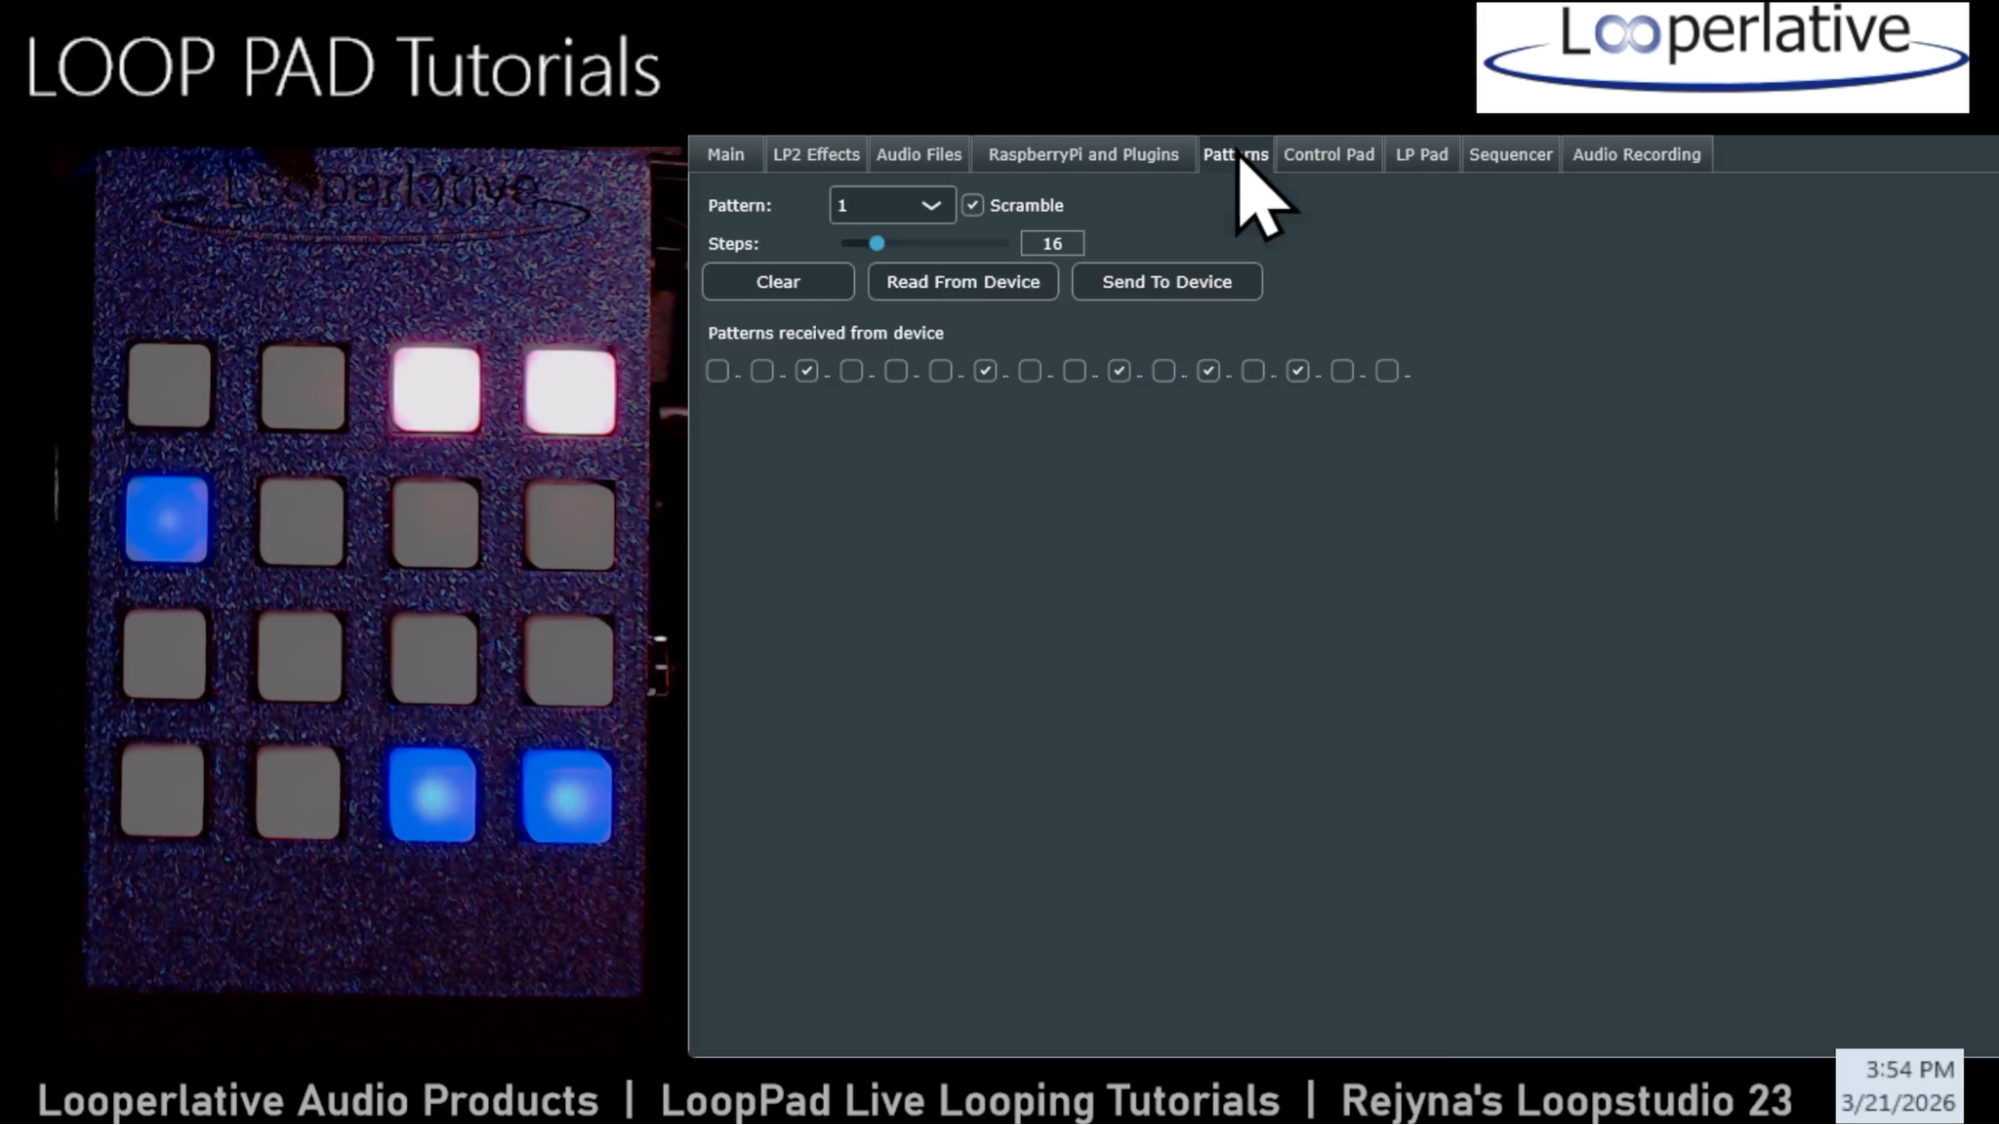
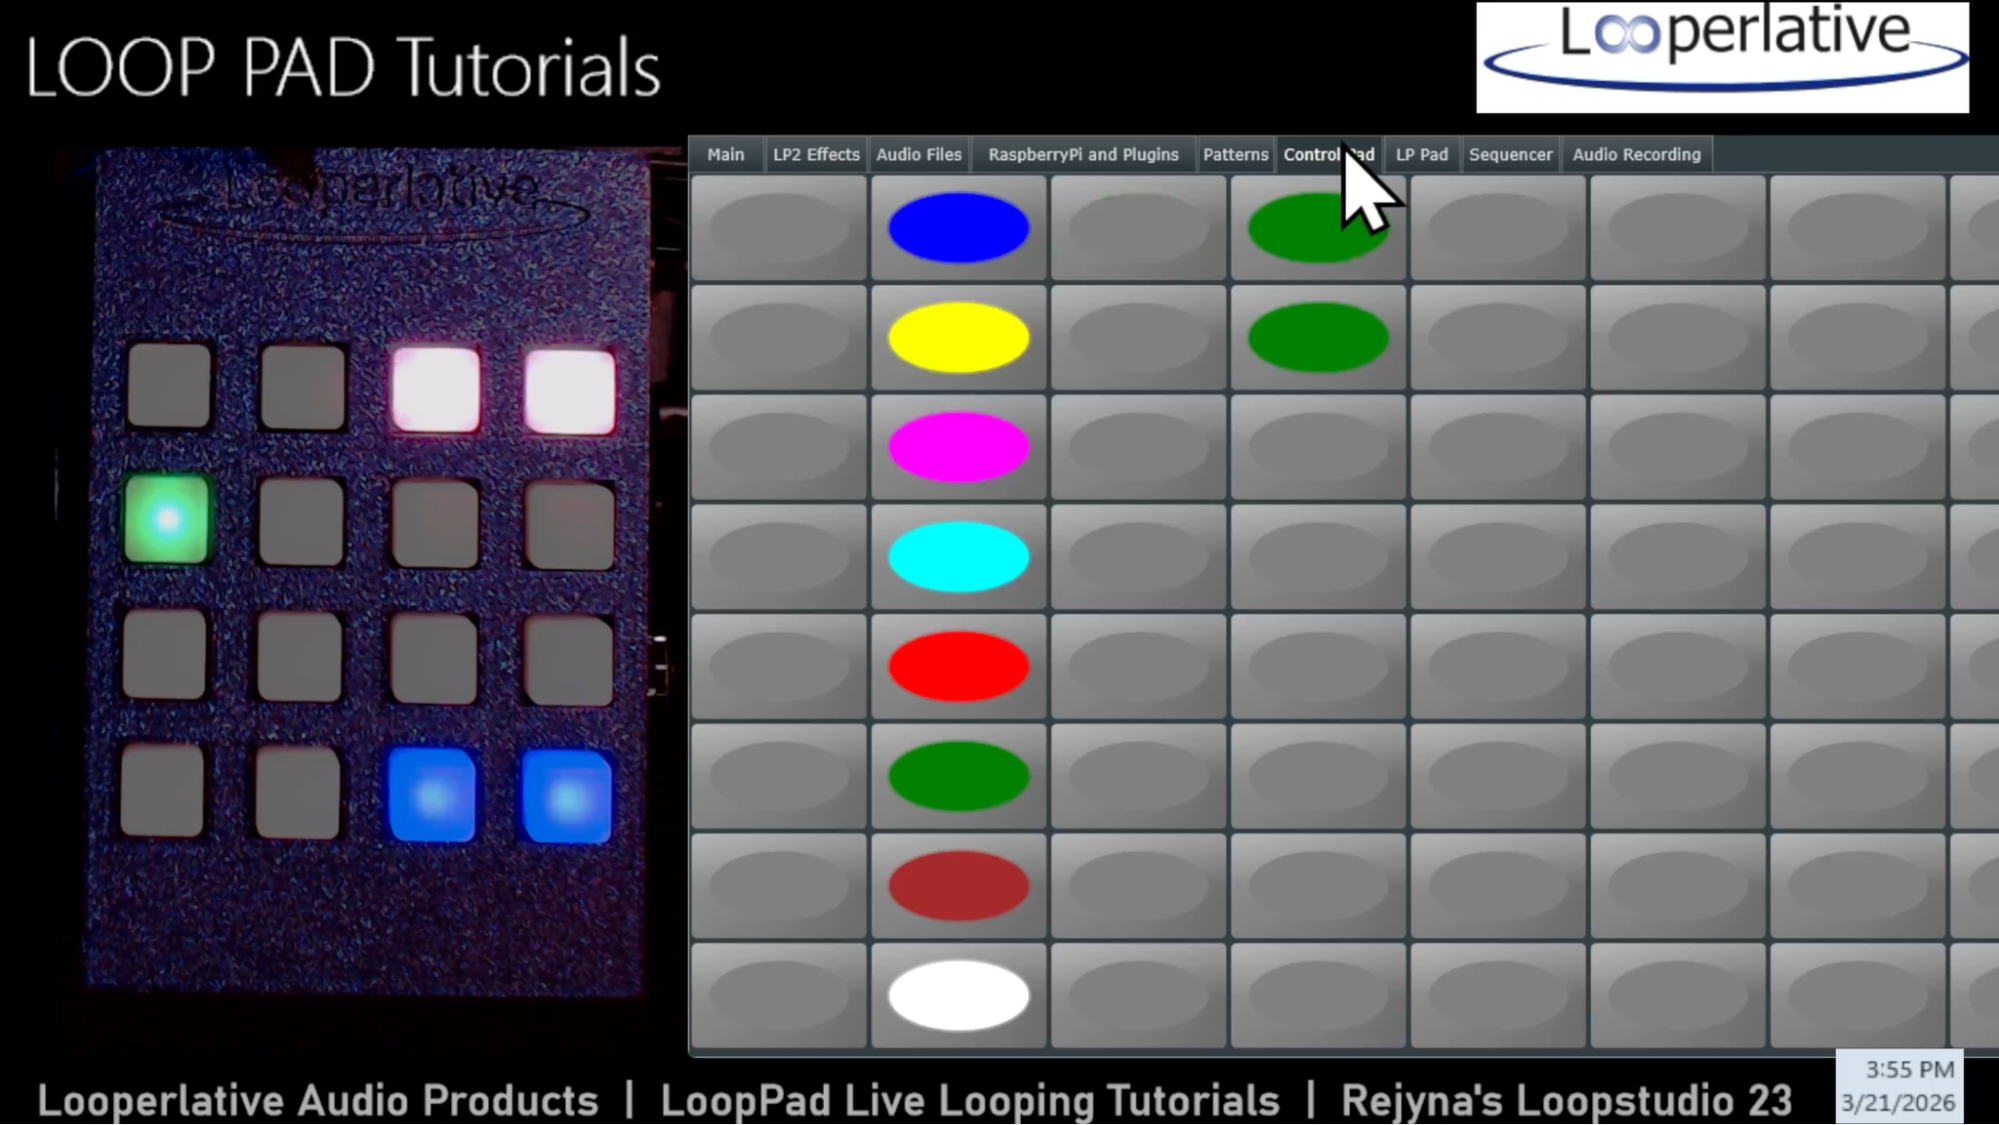
The Control Pad tab is for a basic built-in drum machine, which we will describe in later tutorials.
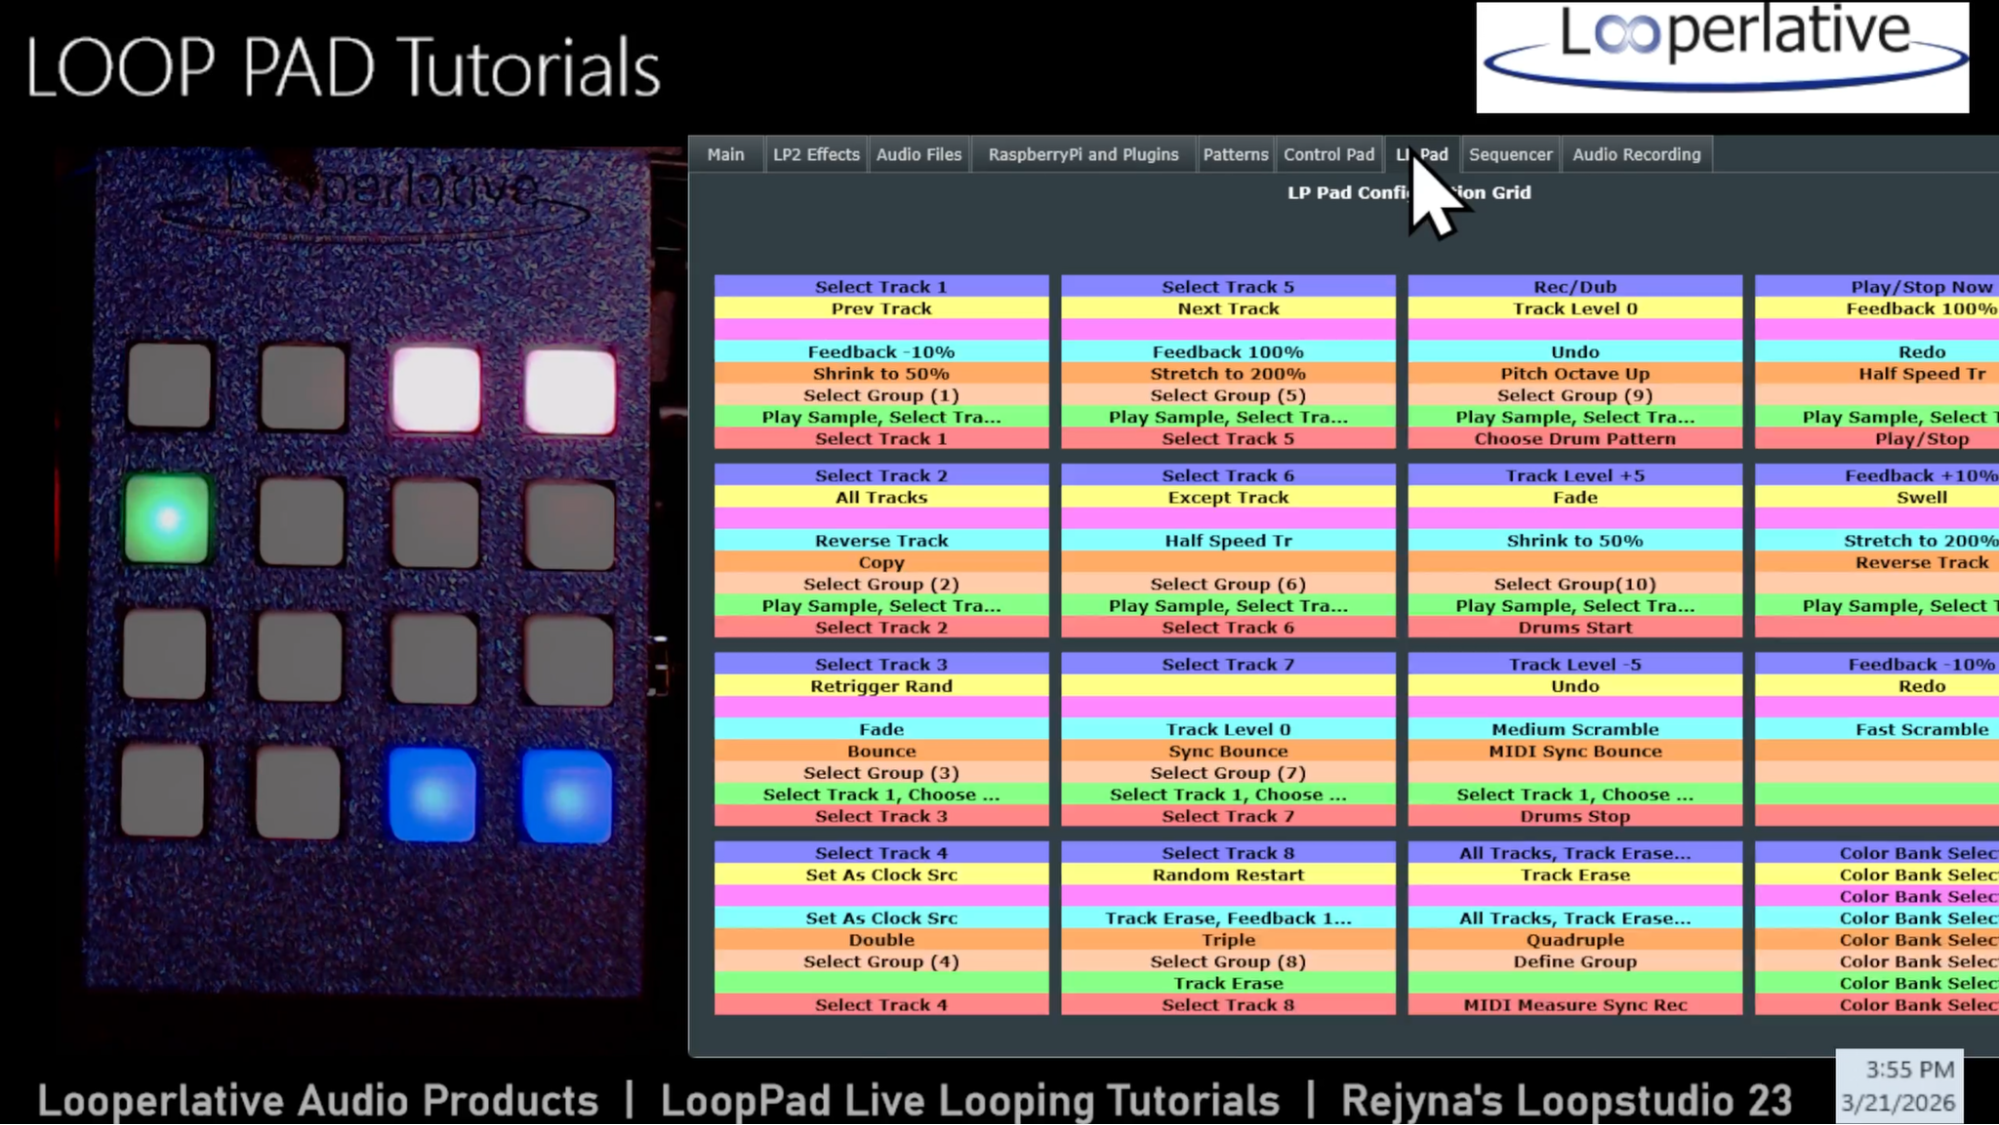
The LP Pad tab is where you can see the legend showing the configuration of all 8 color banks showing the function assignments of each pad of each color bank. This screen updates automatically as you change the Loop Pad button assignments.
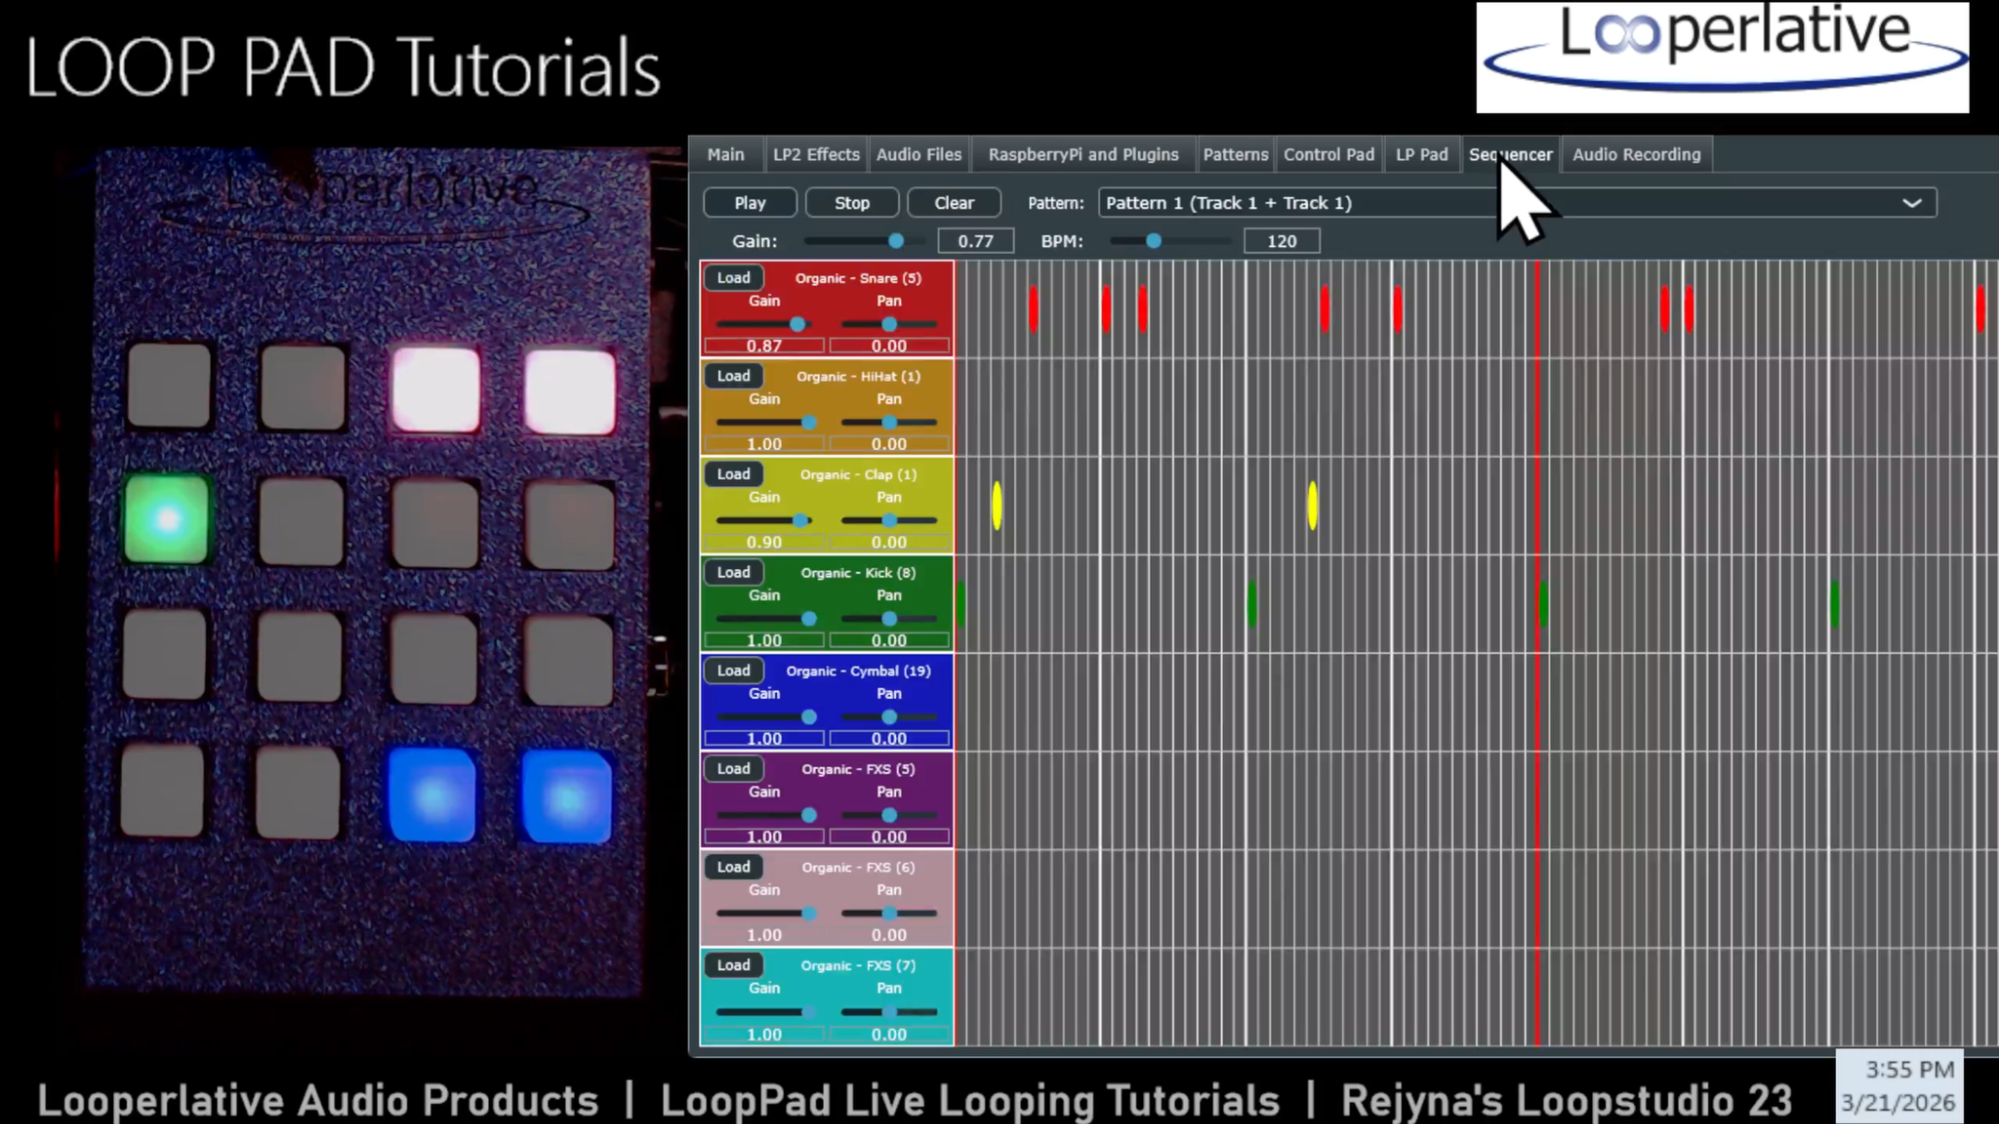
The Sequencer tab is for creating custom patterns, which we will describe in later tutorials.
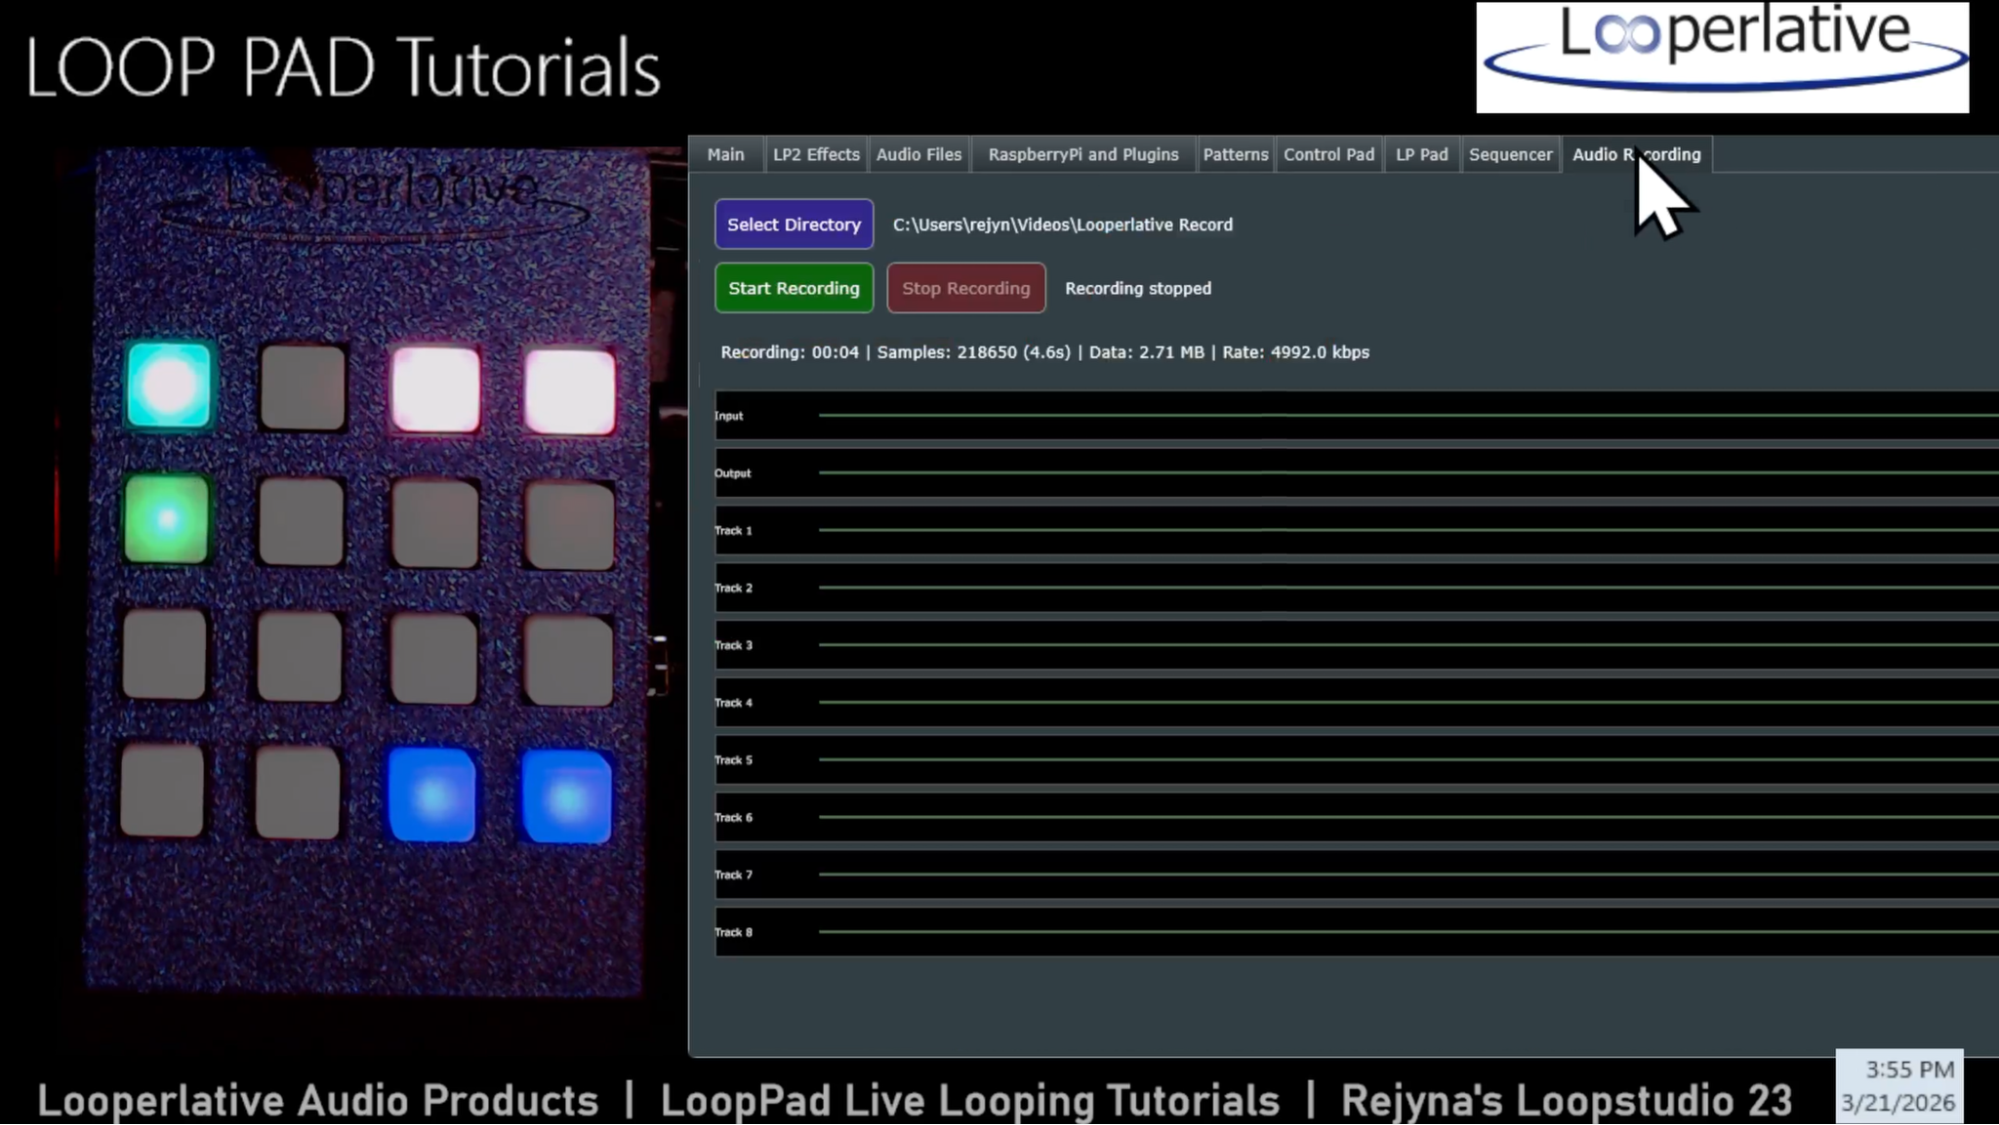
The Audio Recording tab is where you configure wireless recording from the Loop Pad to your computer. Select Directory allows you to point to a specific storage location for the audio files. (Start and Stop Recording buttons are also found on this screen)
EXTERNAL CONTROL:
Let’s click back to the Main tab.
The Loop Pad can also be controlled by foot and hand controllers through USB MIDI interface. You configure the functions of the controller buttons or knobs by using the App and you can observe what is happening on the Loop Pad in realtime using the App.
Go ahead and plug in your controller to one of the USB ports.
Using the App, an external controller can be mapped to the same functions we’ve just used on the pad grid, or to any of the other functions.
Some functions are triggered by buttons, such as program changes, note or pad messages, and CC functions are controlled by pedals or knobs, such as volume, pan, feedback or speed.
When you press a button, turn a knob or use a pedal, the Looperlative Configure app senses it automatically and shows you the command you’ve given. This is where you choose what each command triggers in the Loop Pad.
Below is the current list of available functions for program changes, note and pad messages, and below that is the current list of available functions for CC controllers like pedals or knobs. Our plan is to release weekly tutorial resources that cover each function group, follow and bookmark our pages!
Commands List (* is for LP2 Only)
- All Play
- All Play Now
- All Stop
- All Stop Now
- All Tracks
- Assign To AUX 1
- Assign To AUX 2
- Assign To MAIN
- Bounce
- Bounce MIDI Sync
- Bounce Sync
- Choose Drum Pattern
- Choose User Pattern
- Copy
- Cue Track
- Define Group
- Drums Start
- Drums Stop
- Except Track
- Fade
- Fade/Swell
- Fast Scramble
- Feedback -10%
- Feedback -5%
- Feedback +10%
- Feedback +5%
- Feedback 100%
- Fill Drum Track
- Half Speed Track
- LP2 1/2 Speed
- LP2 1/4 Speed
- LP2 Q Replace 1/7
- LP2 Q Replace 1/8
- LP2 Q Replace 1/9
- LP2 Q Replace 1/10
- LP2 Q Replace 1/11
- LP2 Q Replace 1/12
- LP2 Q Replace 1/13
- LP2 Q Replace 1/16
- LP2 Q Replace 1/24
- LP2 Q Replace 1/64
* LP2 Replace
- LP2 Select Other
- LP2 switch
- Medium Scramble
- MIDI Bypass
- MIDI Start
- MIDI Stop
- Multiply by 2
- Multiply by 3
- Multiply by 4
- Next Track
- Ostinato 16th
- Ostinato 32nd
- Pan Center
- Pitch Octave Up
- Play
- Play Continue Now
- Play Now
- Play Retrigger
- Play Sample
- Play/Stop
- Play/Stop Now
- Prev Track
- Q Replace
- Q Replace+Orig
- Quant Value 1
- Quant Value 2
- Quant Value 3
- Quant Value 4
- Quant Value 5
- Quant Value 6
- Quant Value 7
- Quant Value 8
- Quant Value 9
- Quant Value 10
- Quant Value 11
- Quant Value 12
- Quant Value 13
- Quant Value 14
- Quant Value 15
- Quant Value 16
- Quant Value 24
- Quant Value 32
- Quant Value 48
- Quant Value 64
- Quantized Wait
- Random Restart
- Rec/Dub
- Rec/Dub Internal Sync
- Rec/Dub MIDI Measure Sync
- Rec/Dub MIDI Sync Now
- Rec/Dub Q MIDI Sync
- Redo
- Replace
- Replace (momentary)
- Replace+Original
- Replay/All Stop
- Retrigger Once
- Retrigger Rand
- Retrigger Rhythmic (momentary)
- Reverse Track
- Select Former Track
- Select Group 1
- Select Group 2
- Select Group 3
- Select Group 4
- Select Group 5
- Select Group 6
- Select Group 7
- Select Group 8
- Select Group 9
- Select Group 10
- Select Track 1
- Select Track 2
- Select Track 3
- Select Track 4
- Select Track 5
- Select Track 6
- Select Track 7
- Select Track 8
- Set As Clock Src
- Set As Result Track
- Shrink to 50%
- Slow Scramble
- Stop
- Stop Now
- Stretch to 200%
- Switch-Record
- SwitchPlay
- SwitchPlay+CKSR
- Swell
- Synth Diminished 5th
- Synth Major 2nd
- Synth Major 3rd
- Synth Major 6th
- Synth Major 7th
- Synth Minor 2nd
- Synth Minor 3rd
- Synth Minor 6th
- Synth Minor 7th
- Synth Octave lower
- Synth Original note
- Synth Perfect 4th
- Synth Perfect 5th
- Track Erase
- Track Level
- Track Level -5
- Track Level 0
- Track Level +5
- Undo
- Use Preset 0
- Use Preset 1
- Use Preset 2
- Use Preset 3
- Use Preset 4
- Use Preset 5
- Use Preset 6
- Use Preset 7
- Use Preset 8
- Use Preset 9
- Use Preset 10
It’s also important to again note that each button press can trigger up to 8 functions simultaneously.
One application of this could be when you want to Select (function 1) a specific track and Erase (function 2) it, all with one button press. Another application of this feature could be to select All Tracks (function 1) and Fade/Swell (function 2) with one button press. The possibilities are virtually infinite. The more familiar you become with using the Loop Pad, the more you’ll gain intuition of specific use cases for programming behavior.
When you press a button on the Loop Pad, the current settings are shown in the App and can be changed. The same with an external controller, once it’s hooked up, the Loop Pad sees it and when you press a button, pedal or knob, you can choose from dozens of possible functions.
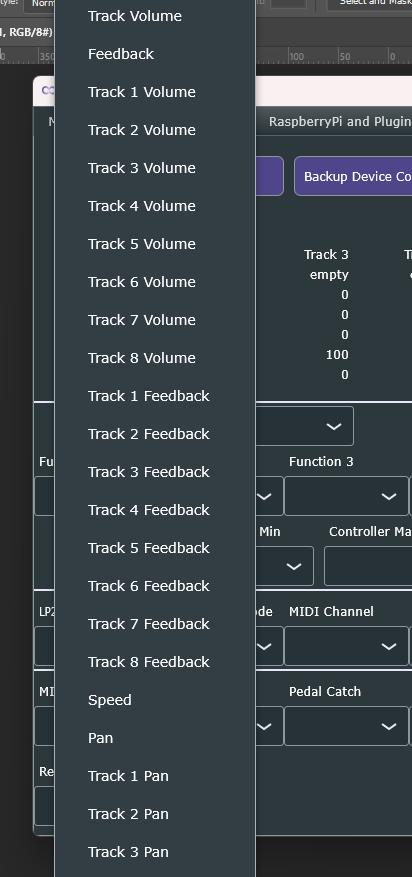
Below are the available commands for Controllers like volume pedals and potentiometers (knobs):
Controller Functions
* affects any/all currently selected tracks:
* Feedback
* Pan
* Speed
- Track 1 Feedback
- Track 1 Pan
- Track 1 Volume
- Track 2 Feedback
- Track 2 Pan
- Track 2 Volume
- Track 3 Feedback
- Track 3 Pan
- Track 3 Volume
- Track 4 Feedback
- Track 4 Pan
- Track 4 Volume
- Track 5 Feedback
- Track 5 Pan
- Track 5 Volume
- Track 6 Feedback
- Track 6 Pan
- Track 6 Volume
- Track 7 Feedback
- Track 7 Pan
- Track 7 Volume
- Track 8 Feedback
- Track 8 Pan
- Track 8 Volume
* Track Volume
Controller Function Controller Min Controller Max
Remember, when connected, in the Main tab, the App will display the current app and firmware versions you’re running. As soon as you see this, you are ready to configure your Loop Pad and external devices. If this flashes between version info and ‘connection lost’, this relates to your connection strength.
As mentioned earlier, you can save 8 configurations of 15 buttons (because 1 button is always the bank select button) represented by the eight LED button colors and the eight colors on the LP Pad tab. You switch between the 8 setups by pressing the bottom right Loop Pad button.
In upcoming deep dive tutorials, we’ll demo different functions and explain each in greater detail, but for now, we just want to give you an overview so you can get started right away without having to do a bunch of tutorials in advance.
When you’ve dialed in a setup you like, you can save the configuration to your computer, recall/load different presets for different shows. It’s really smart to keep a backup so you never lose your rig settings.
Remember that on Audio Recording tab, the Loop Pad can be set to send individual audio tracks as .flac files wirelessly to your computer, so you can capture performances into your DAW without extra cabling.
REVIEW:
In this Getting Started tutorial, you learned how to connect Loop Pad, record and overdub on the tracks, control loops from the pad grid, connect and configure external controllers, and use the Loop Pad app for configuration and backup.
In the next videos, we’ll dive into advanced features, and there are a ton of them—tempo‑synced tricks, unique functions, and some brand‑new Loop Pad options for sound design and performance.
As a user of the Looperlative Audio Products Loop Pad, or any of the Looperlative loopers, you are part of a unique and discerning community of artists. There is no other device currently on the market that offers all the features you’re getting in the Loop Pad and we want to support you and welcome your feedback for improvements and new features.
Please be sure to join the Facebook, Mastodon and Bluesky group, follow the IG page and subscribe to the YouTube channel. Also follow the Looperlative Official Artists to see how they’re demoing and using the Loop Pad and other Looperlative Loopers. Reach out to other Looperlative users on social media and look for a LoopFest in your area, they are all over the globe and several LoopFest artists are using Looperlative loopers.
Thank you for your interest in the Looperlative Audio Devices Loop Pad. We are excited to see what you create with it. Be sure to tag us on social media so we’ll be able to follow your loop adventures.
© 2026 http://looperlative.com